Michelle G Brown | Mixed Media Art

Using Nature as a Substrate

~ * ~

This article is written by Sandee Setliff

Looking for something different to use in your art? Then why not try substrates nature has provided for you.

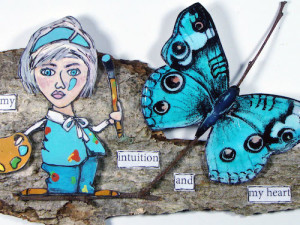
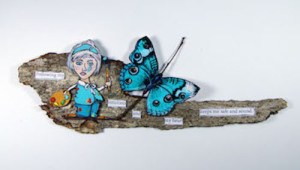
Displaying art on a bark substrate.

Substrate is just a fancy word for the underlying material on which you choose to work on, like paper, canvas, wood or in my case…a piece of bark that had fallen off a tree.

Sometimes my art starts with a walk in the woods, picking up bits and bobs from nature that inspire me. It can be a shape, or perhaps a texture that captures my imagination or just something I like to collect, like leaves and bark.

I brought home this odd shape piece of bark and it sat in my collection bin for awhile before I finally knew what to do with it, for you see, the pieces need to speak to me too. Originally I was going to do this piece on a large leaf but when I began to plunder around in my bin, the bark remnant stood out, like it was calling to me. I already had painted my (self portrait) caricature of an artist, cut out the butterfly and laid out a twig to use, all that remained was printing out a daily affirmation and arranging my elements on the bark to see if everything fit.

Arranging the elements on the substrate to be glued down

Tip:

Once I had arranged everything I began the gluing process. Gluing on an uneven surface can be a bit tricky and one of my go to glues is from Helmar called Liquid Scrap Dots because it conforms to the bumpiest, roughest surface you can imagine and creates a smooth base for even the thinnest of papers.

Using specific glues for specific needs will make the project easier to complete and will make your work more professional.

The last thing to keep in mind is that when using nature for your art also means that the art work will not be permanent but can decay over time unless you preserve it.

~*~*~*~*~*~*~*~*~*~*~*~*~*~*~*~*~*~*~*~*~*~*~*~*~

A little about Sandee Setliff:

Since childhood, I am happiest when I have paint and glue on my hands! Playing with new products and getting messy is time well spent in my book. I create a variety of mix media signs, cards, and altered art, and my creative style ranges from cute and fun to clean and simple which I sell in a local gallery called the Art MoB. My latest passion is art journaling, typography and making hand made paper.  When I am not crafting, I am photographing wildlife and hiking through our lovely North Carolina mountains.

inthehillsofnorthcarolina.blogspot.com

www.facebook.com/Sandees-Artful-Words

www.youtube.com

~*~*~*~*~*~*~*~*~*~*~*~*~*~*~*~*~*~*~*~*~*~*~*~*~

.

.
“Knit the sky” by Lea Redmond – Book review

~ * ~

This article is written by Catriona Laing

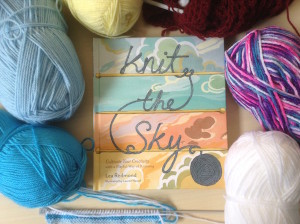
Having read many knitting books in the past, I thought I knew what to expect from ‘Knit The Sky’. If I turned to a random page, I would find a photograph of a finished project, and the precise instructions for how I could replicate that same item. This, however, was not the case. You will find very few definite instructions in this book. Instead, Lea Redmond places an emphasis on creativity, spontaneity, and fun, which is often lost in other, stricter, patterns, as well as mindfulness of the world around the reader. Projects include a purse made from several hexagon shapes, to resemble honeycomb, each of which the knitter is only allowed to make after going outside and smelling some flowers, to remind the knitter of a little worker bee, or a throw rug constructed from many small postcard-size sections, each made after visiting a new place.

Lea Redmond knitting book review

The book itself is a beautiful piece of work. Not a single page is without one of Lauren Nassef’s colourful illustrations, complementing the text on that page excellently. Redmond has succeeded in creating a most inspiring book, which any knitter would do well to own. I myself, for a long time, have been very much a slave to the strict instructions of the pattern before me, though I did not realise it at the time. Now, however, I am looking forward to the new things I can create, with this book as my inspiration.

You can learn more about Knit the Sky on the book’s website www.knitthesky.com

~*~*~*~*~*~*~*~*~*~*~*~*~*~*~*~*~*~*~*~*~*~*~*~*~

My name is Catriona. I am currently in my third year of a Biomedical Science degree, and hope to one day go on to study medicine and become a doctor. However, I’ve got a long way to go before I get there, so in the mean time I enjoy hobbies such as knitting, crochet, playing far more musical instruments than are good for me, and I’ve even dabbled in cosplaying. But knitting is my favourite. Obviously. I really enjoy finding new and interesting patterns to try out, and my all-time favourite thing is when I find someone who likes receiving knitted objects as much as I like making them.

~*~*~*~*~*~*~*~*~*~*~*~*~*~*~*~*~*~*~*~*~*~*~*~*~

Disclosure: This book was provided by R&M West Coast Enterprises for the purpose of review. All opinions are that of the MixedMediaArt team. Some links on this page may be affiliate links and any purchases help to support the ongoing work by MixedMediaArt.
.

.

Review of Janelle Nichols’ “Little Birdie” Online Class

~ * ~

This article is written by Ann Strecko Koeman

A while ago I got the opportunity to review Janelle Nichol’s Mixed Media class: Little Birdie. The class is available at “Skillshare”.  Being an avid maker of all things, and a lover of learning new techniques I was very much looking forward to testing out this new to me format. I can honestly say that I was pleased.

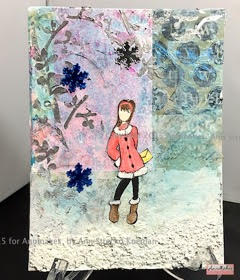
Ann’s project

For one thing, going on the Skillshare website was easy.  Second,  finding the class by Janelle was simple.  All that was required of me were a few clicks on the keyboard. Easy peasy! The hard part came when I began to doubt my own abilities to create something as pretty as the teacher herself had made. However, it did not take long for the soothing voice of the teacher to ease my concerns.

Janelle takes the time to explain all the steps involved in making the project. She gives a lot of information and goes into quite a lot of detail on how to accomplish each step. My favourite aspect of taking the class was the ability it gave me to stop, pause, go back to any part of this video class.  As my own life got quite busy all of a sudden. I needed to take a long break from completing the class.  However, when I returned I was able to just replay the video and begin anew.

Ann’s 2nd project

I enjoyed taking a class in this format because of the flexibility it allowed. I also appreciated the extensive notes and lists that accompany the class. It was a pleasure for me to create two projects over on my Youtube channel Annmakes that were due in part to the influence I got from taking Janelle’s class. The links to the two examples I made are here:


You can view the introduction to the Little Birdie class on Skillshare here.

~*~*~*~*~*~*~*~*~*~*~*~*~*~*~*~*~*~*~*~*~*~*~*~*~

Ann loves to collect and organize as many tools and supplies as possible because she is always making things.  Incredibly she finds a use for most of her collections.  She enjoys making Mixed Media Art because it allows her to use all her skills and collections.

~*~*~*~*~*~*~*~*~*~*~*~*~*~*~*~*~*~*~*~*~*~*~*~*~

Disclosure: Access to this course was supplied by Janelle Nichols for the purpose of review. All opinions are that of the MixedMediaArt team. Some links on this page may be affiliate links and any purchases help to support the ongoing work by MixedMediaArt. 
.

.

DIY Candle Holder

~ * ~

This article is written by Sandra Parés

Today I am going to show you how to make a candle holder with a magic light to illuminate our summer nights.

Candle Holder

The supplies I will use are the following:

  • An open top container glass (to make these candle holders usually I use recycled glass jars)
  • white tissue paper
  • the big shot and a star die
  • 8”x10” Gelli Plate
  • a brayer
  • black acrylic paint
  • a stencil
  • extra heavy gel medium (gloss)
  • 2 paintbrushes
  • Facetten-Lack metallic platin Vica Deco
  • a makeup brush
  • Primary Elements of LuminArte
  • hairspray
  • wire and a candle

First of all we will start using the Gelli Plate: we will use the brayer to put the black paint over the stencil, then we will press the stencil over the gelli plate. With this step we can print the mark of the stencil over the gelli plate. Then we will take a piece of tissue paper, it must be large enough to surround our glass jar. And we put the tissue paper over the gelli plate to print the texture. With this step, the mark of the stencil will print in our tissue paper.

And with the Big Shot and the star die we will open a few holes in our piece of tissue paper.

Candle Holder

Then we will paste with extra heavy gel medium the tissue paper around our glass jar and we will leave it to dry. Then we will paint the holes with Facetten-Lack to give a touch translucent at the glass. For this step, also you can use any paint or paste that allows you to do this translucent effect.

Candle Holder

Once dried we can add the color. I will paint with the Primary Elements of LuminArte, I will use the pigment directly. First of all we have to spray the entire glass jar with hairspray, you will see how the jar is wet. Taking advantage of this dampness, we will catch the Primary Elements pigments (the color or colors that you want) with a makeup brush and we will paint with them making circles. When we run out of pigment or hairspray dries, we will go back to add more product to get the whole jar painted.

Finally, if we want to hang it somewhere, we only need to put some wire around the jar. And don’t forget to put the candle inside!

Candle Holder

You will see that the result will be beautiful and shining: a candle holder with a magic light for our most special nights. The first time I used these candle holders was at my craft stop in the “Enchanted Night”, the shopping night from my city, and they produced an amazing shine!

Candle Holder

~*~*~*~*~*~*~*~*~*~*~*~*~*~*~*~*~*~*~*~*~*~*~*~*~

Sandra Parés loves working with mixed media! The colors and textures leave her amazed and she enjoys creating and getting their hands dirty with paint and gesso! On her site My mixed media you can find a mixed media online store, art and craft products, mixed media workshops in Spanish, tutorials, ideas and mixed media techniques.

~*~*~*~*~*~*~*~*~*~*~*~*~*~*~*~*~*~*~*~*~*~*~*~*~

.

.