Michelle G Brown | Mixed Media Art

Doing What you Love and Loving What you Do

~*~

This article is written by Stacy Steinborn

DO WHAT YOU LOVE, LOVE WHAT YOU DO…This quote has actually stirred controversy in the aspect of making a living and not making a living.  It is mostly interpreted in a thought of what you should do or not do to make money.   Whatever it is you do, you should love it.  The argument for some is, yeah, but you will most likely be broke. Living in Nashville Tennessee the music Capitol of the world, this city is full of thousands upon thousands of broken dreams and hungry musicians.   Now I can’t even begin to write about this argument.   I’m still figuring that one out.  However, I can look at this quote and read into it a little deeper.

Stacy Steinborn

But first, how I came to the conclusion of my interpretation.

As a creator of mixed media art, have you ever finished a piece and shown it to someone and they don’t really react like they like it. I truly feel some people just “don’t get” mixed media.  And I’ve simply come to the conclusion that, that’s okay.

This is a scenario that has happened to me on more than one occasion: At a gathering or function, a group will be talking and someone introduces you to an artist.  In the introduction they state that you do artwork as well.  Then you are questioned, what kind of art do you practice, what style of painting do you prefer? What do you use? And do you sale your art?  To answer these questions I usually say: mixed media, I guess my own style and, I have sold some pieces.  Then you are probed to show your work and you get out your phone show the other artist your pictures, and….crickets.  I find myself for a week or more after this scenario, questioning my talent, my ability, my work in general as an artist.  What an empty feeling to have when it comes to something I love so very much!

If you have ever had a doubt because of other opinions of your work, or because you are just not to the point that you are sure of yourself… I want to encourage you to think about you and your art in a new way.

That bookmark, painting, shadow box, frame, whatever you  have put your hands to do, to make; it has never existed before, not ever.   There may have been other things created like it or similar, you may have looked at something else for inspiration but that very thing you made is the only thing with the brush stroke you made, the glitter you sprinkled, the paper you added, whatever it is you do to your piece of art, it can never be duplicated.  It can never be done the exact same way again.

You are a creator.  You created something.

cre·a·tor   (kr-tr)

n.

1. One that creates

cre·ate   (kr-t)

tr.v. cre·at·ed, cre·at·ing, cre·ates

1. To cause to exist; bring into being. See Synonyms at found1.

2. To give rise to; produce: That remark created a stir.

3. To invest with an office or title; appoint.

4. To produce through artistic or imaginative effort: create a poem; create a role.

adj. Archaic Created.

What a great definition of you!

The next time an “artist” or the “art community” tries to snub, insult you or your work because your not in the right circle or are not up to their standards please read the above definition.  You my dear are amazing because you brought something into existence with your hands and your mind and it is here now.   Take joy in your creation!

This finally brings me to the quote, DO WHAT YOU LOVE, LOVE WHAT YOU DO.  Now think about it again.

DO WHAT YOU LOVE = If you love to paint in circles, in lines, sideways, cross-ways, glue everything but the kitchen sink to your painting, cut strips of paper, add salt to your watercolor, do image transfers, paint the same subject over and over, use stamps, whatever style it is that you use, and you love it…then DO it.

DO WHAT YOU LOVE! When it comes to creating YOUR piece of art…you are the only one who can decide if you love how you do it.  If you are passionate about it you will keep on working at it until you figure out what you love if your not there yet.

Now the second part to that quote.

LOVE WHAT YOU DO = If you have finished your work.  You owe it to yourself to love it. If your not in love with it, love the fact that you did it, you learned from it, even if its what not to do next time, love it.   Don’t let someone’s interpretation of your art become your interpretation of your art.  You did it, you LOVE it! Love your style, love your mistakes(this makes you grow, I promise) love your whimsy, love your boldness, love your subtleness, love the colors you put together, love the lines, love the stamps you chose to use, love your paint covered clothes, love it…love yourself!

If you’ve been struggling with your ability or your style, if its because you are still growing or you have been snubbed or insulted.  Remember three things..

You CREATE

DO WHAT YOU LOVE

LOVE WHAT YOU DO

Stacy Steinborn

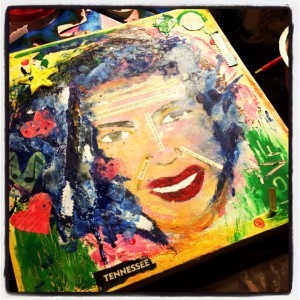
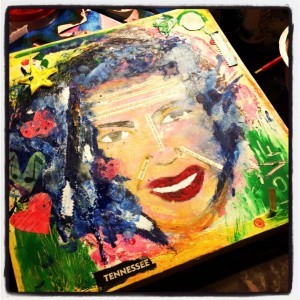
I’m closing with a painting that I created using an image transfer of a sketch I did with a sharpie on packing paper.  I used ephemera from an old love story from the thirties and the colors that make me think of the honky tonks in Nashville. I used a heavy gel medium and a stencil to make the star pop and added layers and scraped off layers until I had the texture I desired.   This lady looks as if she sang in the honky tonks of yesteryear and she was happy, because she did what she loved.

Stacy Steinborn

She has earned her laugh lines, her wrinkles from  her hurts and her worries.  She wore the stories of her life written on her face. But she smiled because she did what she loved.

Stacy Steinborn

I hope you are inspired to love what you do.

Flood your art with your inner light,

Stacy Steinborn


~*~*~*~*~*~*~*~*~*~*~*~*~*~*~*~*~*~*~*~*~*~*~*~*~

Stacy Steinborn lives in a little suburb outside of Nashville called Spring Hill TN in the USA. More of Stacy’s work can be found on her Flooded in Light blog.

~*~*~*~*~*~*~*~*~*~*~*~*~*~*~*~*~*~*~*~*~*~*~*~*~

.

.
A Desert at Sunset Painting by Gloria Malouf-Marsh

~*~

This article is written by Gloria Malouf-Marsh

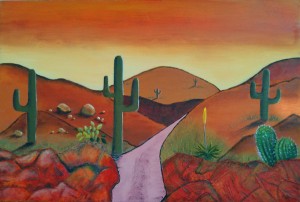
I started this painting from scratch.  I imagined a desert scene, I introduced working with sand textures, texture paste, warm colors sprang to my mind. The gold/yellows/oranges, different shades of hues, spindly plants that thrive in the desert climate, rock techniques, cactuses and the like. I also worked with dark and light – shadow and brightness.

Gloria Malouf-Marsh's Desert at SunsetI started at first to gesso the canvas. From 2/3 of the canvas up, I applied a paste and sand composition and let dry. This raised the texture and added an atmosphere to the base of the picture, which I would like to call a desert composition.   I had no idea where I was going; I just allowed my creativity to lead me.  I knew there was a road leading me somewhere. This road, I could see far in the distance. So I sketched mountains, rocks, cactuses, and started to build the tones and the painting started to come alive.  The rock face at the bottom and foreground was built up with texture paste composition.  I used a palette knife to apply knife shapes and irregular shapes to create the jagged rocks.   I wanted to maintain the warm shades and not to introduce any cool shades.

The different shades of the sunset were very effective.  I painted the area from the mountains upwards with vermilion red and used graduated shades of yellow/gold/ orange to create the sunset-scape.

As the painting was taking shape, I was transported into an earthy desert and the connection to the earth was of paramount importance to me. It’s also a form of meditation for me.  The warmth of the earth beckoned me deeper to the roots of the soil. I felt very close to the earth and very grounded. The symbolic meaning evoked a sense of humility and a deep sense of  gratitude. This desert time  brings on a change of heart, a transformation and a time to reflect.

The desert represents the hardships and challenges one has to overcome in one’s life. And through this challenge, one comes out so much better for it.

Keep creating! Enjoy!

~ * ~ * ~ * ~ * ~ * ~ * ~ * ~ * ~ * ~ * ~ * ~ *  ~

My name is Gloria Malouf-Marsh. I live in Brisbane, Australia, with my husband Greg and my daughter Salwa .  Springtime is glorious in Brisbane. I rise early and go for brisk walks, do my yoga practice and I’m inspired to face the day with inspiration and confidence. I get creative ideas for painting when I’m in nature. I love listening to nature’s sounds and watching and hearing the birds.

I am developing discipline in creating and making time for myself to daily paint. I seem curious to want to further my techniques.  I’m working with the building texture  mediums.  A sense of confidence and enjoyment has developed with me regarding honing my skills and techniques in the art medium, and I do enjoy this website so much.  Hearing peoples’ ideas and seeing their talents, just simply amaze me.  It is a special global family.   If I can create, so can you! Enjoy!

.

.

Starting a Mini Altered Houses?

~*~

Melanie Statnick has put together the materials list and instructions for these cute mini houses.

Supply List

To create your own village, you will need:
  • Wooden houses
  • wooden pieces including hearts, tags, bingo tiles, fence , rulers.
  • Tissue paper,
  • decoupage,
  • flat brush/glue brush,
  • glossy accents,
  • letter stickers,
  • Walnut Ink Spray
  • a heat gun.

How to make a Mini Altered Houses?

Instructions

Step 1. Decoupage tissue paper to wood houses. Apply glue directly to wood. The tissue paper will move around and might rip. This is the look we are going for. Grungy, wrinkled look. Dry with heat gun and set aside.

How to make a Mini Altered Houses?

Step 2. Spray all wood pieces with your Walnut Spray Ink. Dab with paper towel and dray with heat gun. This will the wood an antique look with some grunge.

How to make a Mini Altered Houses?

Step 3. Using glossy accents glue fence onto front side of your houses and continue with the other wood pieces. You can arrange them how you like.

How to make a Mini Altered Houses?

How to make a Mini Altered Houses?

Step 4. After your pieces are glued and dried, you can now add your word art. Last use Glamor Dust, Liquid Pearls, or Stickles to add details.

How to make a Mini Altered Houses?

Happy Creating!

~*~*~*~*~*~*~*~*~*~*~*~*~*~*~*~*~*~*~*~*~*~*~*~*~

I’m a Canadian Mixed Media & Collage Artist out of North Carolina. I create art daily from my private studio and my artwork is fun and whimsy. I teach mixed media and art journaling online  and I hold mixed media workshops around the USA.

My artwork can be found in art galleries and shops extensively in NC with international private collections. I have created my personal line of original stamps to purchase and use in your art.

~*~*~*~*~*~*~*~*~*~*~*~*~*~*~*~*~*~*~*~*~*~*~*~*~
.

.

Creating a Mini Mixed Media Canvas

~*~

Kina, from The Stamp Room, has made this cute little mixed media collage on a 4″ x 4″ canvas. She shares her process with us.

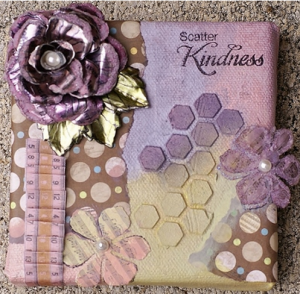
This little 4×4 canvas was gessoed, I then took my new Hexagon 6×6 stencil from the Crafters Workshop and a little embossing paste.

While this was all drying, my Prickley Pear Rubber Stamp large Hibiscus die came out. I punched out 4 flowers in metal, used Copic RV93 and RV95 to color them, and made the large flower by cutting and gluing it.

Next I stamped with Archival ink, I used both of the PPRS Hibiscus Clear Stamp sets. I also used the smaller Hibiscus die and cut out 3 paper flowers using BoBunny’s “C’est La Vie” paper pad.

Time to paint!! I used my new Art Anthology Inc. Colorations Vineyard Spray as well as Distress Victorian Velvet and Bundled Sage. Glued down paper, again from BoBunny’s  C’est La Vie paper collection, and a strip of folded washi tape from Prima’s Sunrise Sunset collection.

My big metal flower and one of the little ones got tiny orchid colored glassbeads glued to the edges and I added a white “pearl” to the middle of each flower, glued the big flower in place and stamped my Sentiment from the PPRS Hibiscus Set 2 in Archival ink.

Mini Mixed Media Canvas by Kina

I sure hope you enjoy it as much as I enjoyed making it!

~*~*~*~*~*~*~*~*~*~*~*~*~*~*~*~*~*~*~*~*~*~*~*~*~

Kina can be found, hanging out in her Stamp Room in Florida, USA.

~*~*~*~*~*~*~*~*~*~*~*~*~*~*~*~*~*~*~*~*~*~*~*~*~

.

.