~*~
This article was written by Martice Smith II
Digital Quote Collage with Martice
SUPPLY LIST:
- Image editing program/software (Photoshop, or a free program like Picmonkey)
- Monoprints / collage
- White cardstock
- Pigma Micron pens, black (05 and brush)
- pencil + vinyl eraser
Creative Hand-lettering:
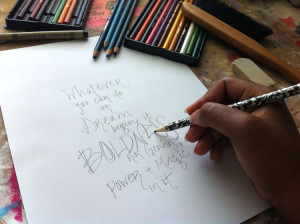
Write your favorite quote on white cardstock.
Have fun with this! Write some words bigger than others to put visual emphasis on them.
Made a mistake? No problem! I like using a vinyl eraser to remove mistakes and accidental graphite smears.
(TIP: place a sheet of paper under your palm to prevent smearing. Saves time on cleaning up your final image!)
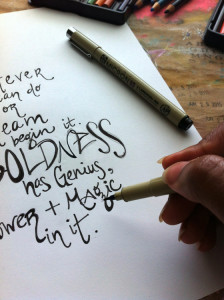
Trace over your quote with black Pigma Micron pens.
I traced the entire quote with 05 and a brush pen for a faux-calligraphy look. Add variety to the design of your letterforms. Making the downstrokes thicker will give the letters more visual weight! Finally, erase all pencil lines with a vinyl eraser.
Now, let’s dive into the digital realm of this tutorial!
STEP 1// Scan your monoprinted/collage background and your hand-lettered quote. These should be two separate documents.
(TIP: Adjust the settings so that your image is black and white with high contrast.)
STEP 2// Launch Photoshop. Open your monoprinted/collage background. Duplicate the background layer.
Next, create a new layer.
Using the rectangle tool, draw a rectangle large enough to fit the quote.
Fill the rectangle with a light color. (I chose yellow as my fill color.)
Lower the opacity to 48% or play around with the opacity level so that the monoprinted/collage background barely peeks through.
STEP 3// Select the brush tool then choose white for the brush color. Outline the rectangle with white dots.
Rearrange the layers: Click and drag the yellow rectangle on top of this layer of white dots. (Now the dots look as though they’re behind the yellow rectangle. Cool, huh?
STEP 4// Import your hand-lettered quote into this document.
Set the blending mode to Multiply. (Cycle through the various blending modes to see which one looks best for you.) Position the quote on top of the yellow rectangle.
(TIP: You’ll want the quote to stand out from the colored rectangle, so that the words aren’t competing against the image behind it. Black letters are best to work with.)
STEP 5// Add a layer mask
The purpose of a layer mask is, simply, a non-destructive way to edit an image. It gives you more control over certain parts of an image so that it only changes specific parts.
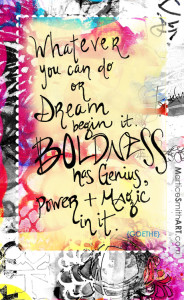
Take a look at the final image, below. Notice how you can see through certain parts of the yellow rectangle while other parts or more opaque?
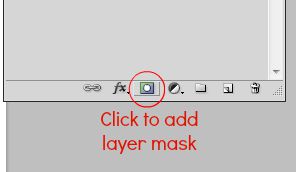
To create a mask, just click on the layer with the yellow rectangle, then click the rectangle icon, next to the ‘create a new fill or adjustment layer’ thumbnail, at the bottom of the Layers panel (See screenshot, below).
STEP 6// Select the brush tool. Use black for the brush color.
With this approach, you’re removing color where you don’t want it. Or in other words, you’re erasing the yellow.
Switching the brush color to white adds the yellow back in.
(TIP: You can change the opacity, shape and size of the brush strokes by accessing the brush preset menu. Here’s how I remember which color to use: Black conceals, white reveals.)
Troubleshooting Tips:
- Did you remove too much color? If so, change the color of your brush to white. Paint in where you want the color to re-appear.
- Vary the size of your brush to get as detailed as you wish.
- If you make a mistake, simply alternate between black and white to “conceal or reveal” the color.
- Try adjusting the Opacity of the brush to reduce the impact of the adjustment in some areas.
STEP 7// Merge layers and crop!
Merge all layers together. For this example, I gave myself one inch borders on the top, left and right sides and 2 1/2 inches on the bottom for visual weight.
STEP 8// Save and name your document
I hope this tutorial encouraged you to try your hand at digital art making! Feel free to ask questions, if you’re unsure about a specific step. I’m always happy to help
Happy creating!
~*~*~*~*~*~*~*~*~*~*~*~*~*~*~*~*~*~*~*~*~*~*~*~*~
Author bio:
Martice Smith II is creative director of Martice Smith II – Illustration & Design Studio and online boutique owner. As a published multi-medium artist, Martice shares her passion as an educator and design team member for multiple manufacturers, where her tutorial topics range from merging traditional art with digital techniques, to fashion illustration, to creative hand-lettering and more.
Martice is committed to helping you create + live your most soulful, wildest + colorful dreams…to the maxx! Discover more tutorials on her blog and join her colorful museletter
~*~*~*~*~*~*~*~*~*~*~*~*~*~*~*~*~*~*~*~*~*~*~*~*~
.
.



Fabulous tutorial, Martice!
Thank you, Barbara!