Doing What you Love and Loving What you Do

~*~

This article is written by Stacy Steinborn

DO WHAT YOU LOVE, LOVE WHAT YOU DO…This quote has actually stirred controversy in the aspect of making a living and not making a living.  It is mostly interpreted in a thought of what you should do or not do to make money.   Whatever it is you do, you should love it.  The argument for some is, yeah, but you will most likely be broke. Living in Nashville Tennessee the music Capitol of the world, this city is full of thousands upon thousands of broken dreams and hungry musicians.   Now I can’t even begin to write about this argument.   I’m still figuring that one out.  However, I can look at this quote and read into it a little deeper.

Stacy Steinborn

But first, how I came to the conclusion of my interpretation.

As a creator of mixed media art, have you ever finished a piece and shown it to someone and they don’t really react like they like it. I truly feel some people just “don’t get” mixed media.  And I’ve simply come to the conclusion that, that’s okay.

This is a scenario that has happened to me on more than one occasion: At a gathering or function, a group will be talking and someone introduces you to an artist.  In the introduction they state that you do artwork as well.  Then you are questioned, what kind of art do you practice, what style of painting do you prefer? What do you use? And do you sale your art?  To answer these questions I usually say: mixed media, I guess my own style and, I have sold some pieces.  Then you are probed to show your work and you get out your phone show the other artist your pictures, and….crickets.  I find myself for a week or more after this scenario, questioning my talent, my ability, my work in general as an artist.  What an empty feeling to have when it comes to something I love so very much!

If you have ever had a doubt because of other opinions of your work, or because you are just not to the point that you are sure of yourself… I want to encourage you to think about you and your art in a new way.

That bookmark, painting, shadow box, frame, whatever you  have put your hands to do, to make; it has never existed before, not ever.   There may have been other things created like it or similar, you may have looked at something else for inspiration but that very thing you made is the only thing with the brush stroke you made, the glitter you sprinkled, the paper you added, whatever it is you do to your piece of art, it can never be duplicated.  It can never be done the exact same way again.

You are a creator.  You created something.

cre·a·tor   (kr-tr)

n.

1. One that creates

cre·ate   (kr-t)

tr.v. cre·at·ed, cre·at·ing, cre·ates

1. To cause to exist; bring into being. See Synonyms at found1.

2. To give rise to; produce: That remark created a stir.

3. To invest with an office or title; appoint.

4. To produce through artistic or imaginative effort: create a poem; create a role.

adj. Archaic Created.

What a great definition of you!

The next time an “artist” or the “art community” tries to snub, insult you or your work because your not in the right circle or are not up to their standards please read the above definition.  You my dear are amazing because you brought something into existence with your hands and your mind and it is here now.   Take joy in your creation!

This finally brings me to the quote, DO WHAT YOU LOVE, LOVE WHAT YOU DO.  Now think about it again.

DO WHAT YOU LOVE = If you love to paint in circles, in lines, sideways, cross-ways, glue everything but the kitchen sink to your painting, cut strips of paper, add salt to your watercolor, do image transfers, paint the same subject over and over, use stamps, whatever style it is that you use, and you love it…then DO it.

DO WHAT YOU LOVE! When it comes to creating YOUR piece of art…you are the only one who can decide if you love how you do it.  If you are passionate about it you will keep on working at it until you figure out what you love if your not there yet.

Now the second part to that quote.

LOVE WHAT YOU DO = If you have finished your work.  You owe it to yourself to love it. If your not in love with it, love the fact that you did it, you learned from it, even if its what not to do next time, love it.   Don’t let someone’s interpretation of your art become your interpretation of your art.  You did it, you LOVE it! Love your style, love your mistakes(this makes you grow, I promise) love your whimsy, love your boldness, love your subtleness, love the colors you put together, love the lines, love the stamps you chose to use, love your paint covered clothes, love it…love yourself!

If you’ve been struggling with your ability or your style, if its because you are still growing or you have been snubbed or insulted.  Remember three things..

You CREATE

DO WHAT YOU LOVE

LOVE WHAT YOU DO

Stacy Steinborn

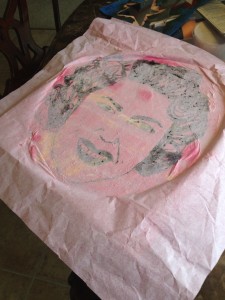
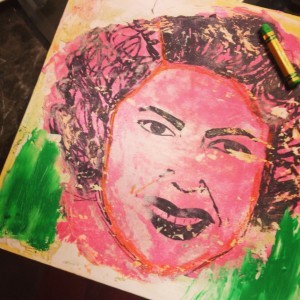
I’m closing with a painting that I created using an image transfer of a sketch I did with a sharpie on packing paper.  I used ephemera from an old love story from the thirties and the colors that make me think of the honky tonks in Nashville. I used a heavy gel medium and a stencil to make the star pop and added layers and scraped off layers until I had the texture I desired.   This lady looks as if she sang in the honky tonks of yesteryear and she was happy, because she did what she loved.

Stacy Steinborn

She has earned her laugh lines, her wrinkles from  her hurts and her worries.  She wore the stories of her life written on her face. But she smiled because she did what she loved.

Stacy Steinborn

I hope you are inspired to love what you do.

Flood your art with your inner light,

Stacy Steinborn


~*~*~*~*~*~*~*~*~*~*~*~*~*~*~*~*~*~*~*~*~*~*~*~*~

Stacy Steinborn lives in a little suburb outside of Nashville called Spring Hill TN in the USA. More of Stacy’s work can be found on her Flooded in Light blog.

~*~*~*~*~*~*~*~*~*~*~*~*~*~*~*~*~*~*~*~*~*~*~*~*~

.

.

How to Make Your Own Business Cards

This article was written by Jean Mullins

Supplies required

Computer and printer

Laminator (optional)

Coloured Card stock A4 size. This will give you approx. 10 cards depending   on the size.

Water colour paper or thin card A4 size or larger, not printer paper as this is too thin.

Glue, acrylic paint or inks, stencils, stamps etc.

Creating back of cards

Step 1.

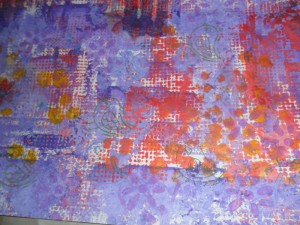
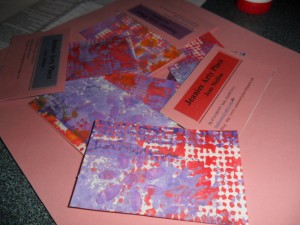
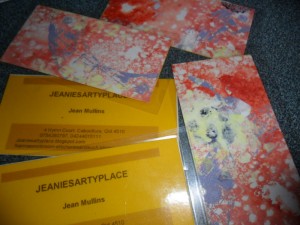
Paint, stencil, and stamp the paper or thin cardboard.  I used Jo Sonjas paints, simply because I have a lot, I love Cad red light, Norwegian orange, French blue, white, touch of yellow, and violet, I used stencils, then stamps.

I made 2 separate backing papers so some cards have the orangey back and some the violet shades.

Making  a DIY business card

TIP: If your painted paper is lumpy and bumpy, for example if you use texture paste, buttons or similar, it will be harder to laminate, creates wrinkles, air pockets etc.

Step 2.

While your painted paper is drying, create your business card.

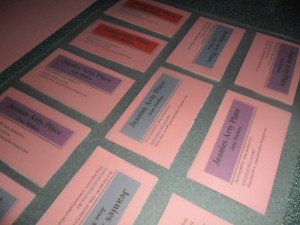
I used an Avery template, 10 cards to the page.Type the wording you want on your cards, name address, webpage, what you do etc.Save,and then print them out on the card stock, use a colour that will blend with the paper you have just painted. Cut each card out.

Step 3.

When the painted paper is dry, use a cut out card as a template on the back of the paper draw around it, this will give you the right size to cut for each card. Cut them out.

Tips in making your own business cards

Step 4.

Now you require one of each, using a glue stick, dab a bit of glue on each card as you stick the front to the back take care to have them back to back. Trim if required.

TIP. Use just a dab of glue and press the 2 pieces together firmly.

Tips in making your own business cards

Step 5.

The fun bit Laminating.

Get your laminator ready, turn it on to warm up.

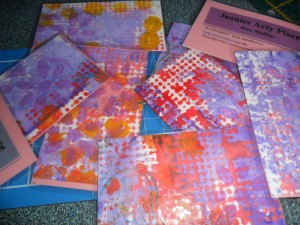
Lay a laminating pouch on a flat surface, open it, then dab the glue stick on each card as you position it on the laminating sheet. Leave a little space between so that they each seal. (Approx. 10/11 per sheet). When the laminator is ready carefully lift and feed through.

Now cut and separate each of your beautiful, unique business cards and say wow. Trim excess laminate off each card.

For those of you who don’t have access to a laminator, office supplies or similar place will laminate them for you.

Alternatively after glueing the 2 pieces together, use a brad in opposite corners or eyelet in one corner then tie with string cord etc.

Tips in making your own business cards

Tips in making your own business cards

~*~*~*~*~*~*~*~*~*~*~*~*~*~*~*~*~*~*~*~*~*~*~*~*~

Jean Mullins (Stevenson) lives at Caboolture Queensland with 2 little dogs.

Mother and grandmother, Jean is passionate about teaching and passing her knowledge on to everyone she can. Author, pattern designer, magazine contributor for many years, Jean loves to create and play with paint, as well as tutor at U3A.

You can see more of my work at: nannasworkroom-stitcheriesandsuch.blogspot.com & www.jeaniesartyplace.blogspot.com

~*~*~*~*~*~*~*~*~*~*~*~*~*~*~*~*~*~*~*~*~*~*~*~*~

.

.

DIY Business Cards

This article was written by Jean Mullins

Supplies required

Computer and printer

Laminator (optional)

Coloured Card stock A4 size. This will give you approx. 10 cards depending   on the size.

Water colour paper or thin card A4 size or larger, not printer paper as this is too thin.

Glue, acrylic paint or inks, stencils, stamps etc.

Creating back of cards

Step 1.

Paint, stencil, and stamp the paper or thin cardboard.  I used Jo Sonjas paints, simply because I have a lot, I love Cad red light, Norwegian orange, French blue, white, touch of yellow, and violet, I used stencils, then stamps.

I made 2 separate backing papers so some cards have the orangey back and some the violet shades.

Create unique business cards

TIP>If your painted paper is lumpy and bumpy, for example if you use texture paste, buttons or similar, it will be harder to laminate, creates wrinkles, air pockets etc.

Step 2.

While your painted paper is drying, create your business card.

I used an Avery template, 10 cards to the page.Type the wording you want on your cards, name address, webpage, what you do etc.Save,and then print them out on the card stock, use a colour that will blend with the paper you have just painted. Cut each card out.

Step 3.

When the painted paper is dry, use a cut out card as a template on the back of the paper draw around it, this will give you the right size to cut for each card. Cut them out.

Create unique business cards

Step 4.

Now you require one of each, using a glue stick, dab a bit of glue on each card as you stick the front to the back take care to have them back to back. Trim if required.

TIP. Use just a dab of glue and press the 2 pieces together firmly.

Step 5.

The fun bit Laminating.

Get your laminator ready, turn it on to warm up.

Lay a laminating pouch on a flat surface, open it, then dab the glue stick on each card as you position it on the laminating sheet. Leave a little space between so that they each seal. (Approx. 10/11 per sheet). When the laminator is ready carefully lift and feed through.

Now cut and separate each of your beautiful, unique business cards and say wow. Trim excess laminate off each card.

For those of you who don’t have access to a laminator, office supplies or similar place will laminate them for you.

Alternatively after glueing the 2 pieces together, use a brad in opposite corners or eyelet in one corner then tie with string cord etc.

~*~*~*~*~*~*~*~*~*~*~*~*~*~*~*~*~*~*~*~*~*~*~*~*~

Jean Mullins (Stevenson) lives at Caboolture Queensland with 2 little dogs.

Mother and grandmother, Jean is passionate about teaching and passing her knowledge on to everyone she can. Author, pattern designer, magazine contributor for many years, Jean loves to create and play with paint, as well as tutor at U3A.

You can see more of my work at:

www.nannasworkroom-stitcheriesandsuch.blogspot.com

www.jeaniesartyplace.blogspot.com

~*~*~*~*~*~*~*~*~*~*~*~*~*~*~*~*~*~*~*~*~*~*~*~*~

.

.
Do What You Love, Love What You Do

This article is written by Stacy Steinborn

DO WHAT YOU LOVE, LOVE WHAT YOU DO…This quote has actually stirred controversy in the aspect of making a living and not making a living.  It is mostly interpreted in a thought of what you should do or not do to make money.   Whatever it is you do, you should love it.  The argument for some is, yeah, but you will most likely be broke. Living in Nashville Tennessee the music Capitol of the world, this city is full of thousands upon thousands of broken dreams and hungry musicians.   Now I can’t even begin to write about this argument.   I’m still figuring that one out.  However, I can look at this quote and read into it a little deeper.

honky tonk woman in mixed media collageBut first, how I came to the conclusion of my interpretation.

As a creator of mixed media art, have you ever finished a piece and shown it to someone and they don’t really react like they like it. I truly feel some people just “don’t get” mixed media.  And I’ve simply come to the conclusion that, that’s okay.

This is a scenario that has happened to me on more than one occasion: At a gathering or function, a group will be talking and someone introduces you to an artist.  In the introduction they state that you do artwork as well.  Then you are questioned, what kind of art do you practice, what style of painting do you prefer? What do you use? And do you sale your art?  To answer these questions I usually say: mixed media, I guess my own style and, I have sold some pieces.  Then you are probed to show your work and you get out your phone show the other artist your pictures, and….crickets.  I find myself for a week or more after this scenario, questioning my talent, my ability, my work in general as an artist.  What an empty feeling to have when it comes to something I love so very much!

If you have ever had a doubt because of other opinions of your work, or because you are just not to the point that you are sure of yourself… I want to encourage you to think about you and your art in a new way.

That bookmark, painting, shadow box, frame, whatever you  have put your hands to do, to make; it has never existed before, not ever.   There may have been other things created like it or similar, you may have looked at something else for inspiration but that very thing you made is the only thing with the brush stroke you made, the glitter you sprinkled, the paper you added, whatever it is you do to your piece of art, it can never be duplicated.  It can never be done the exact same way again.

You are a creator.  You created something.

cre·a·tor   (kr-tr)

n.

1. One that creates

cre·ate   (kr-t)

tr.v. cre·at·ed, cre·at·ing, cre·ates

1. To cause to exist; bring into being. See Synonyms at found1.

2. To give rise to; produce: That remark created a stir.

3. To invest with an office or title; appoint.

4. To produce through artistic or imaginative effort: create a poem; create a role.

adj. Archaic Created.

What a great definition of you!

The next time an “artist” or the “art community” tries to snub, insult you or your work because your not in the right circle or are not up to their standards please read the above definition.  You my dear are amazing because you brought something into existence with your hands and your mind and it is here now.   Take joy in your creation!

This finally brings me to the quote, DO WHAT YOU LOVE, LOVE WHAT YOU DO.  Now think about it again.

DO WHAT YOU LOVE = If you love to paint in circles, in lines, sideways, cross-ways, glue everything but the kitchen sink to your painting, cut strips of paper, add salt to your watercolor, do image transfers, paint the same subject over and over, use stamps, whatever style it is that you use, and you love it…then DO it.

DO WHAT YOU LOVE! When it comes to creating YOUR piece of art…you are the only one who can decide if you love how you do it.  If you are passionate about it you will keep on working at it until you figure out what you love if your not there yet.

Now the second part to that quote.

LOVE WHAT YOU DO = If you have finished your work.  You owe it to yourself to love it. If your not in love with it, love the fact that you did it, you learned from it, even if its what not to do next time, love it.   Don’t let someone’s interpretation of your art become your interpretation of your art.  You did it, you LOVE it! Love your style, love your mistakes(this makes you grow, I promise) love your whimsy, love your boldness, love your subtleness, love the colors you put together, love the lines, love the stamps you chose to use, love your paint covered clothes, love it…love yourself!

If you’ve been struggling with your ability or your style, if its because you are still growing or you have been snubbed or insulted.  Remember three things..

You CREATE

DO WHAT YOU LOVE

LOVE WHAT YOU DO

Sharpie sketch on packing paper

I’m closing with a painting that I created using an image transfer of a sketch I did with a sharpie on packing paper.  I used ephemera from an old love story from the thirties and the colors that make me think of the honky tonks in Nashville. I used a heavy gel medium and a stencil to make the star pop and added layers and scraped off layers until I had the texture I desired.   This lady looks as if she sang in the honky tonks of yesteryear and she was happy, because she did what she loved.

gel medium image transfer

She has earned her laugh lines, her wrinkles from  her hurts and her worries.  She wore the stories of her life written on her face. But she smiled because she did what she loved.

honky tonk woman in mixed media collage

I hope you are inspired to love what you do.

Flood your art with your inner light,

Stacy Steinborn


~*~*~*~*~*~*~*~*~*~*~*~*~*~*~*~*~*~*~*~*~*~*~*~*~

Stacy Steinborn lives in a little suburb outside of Nashville called Spring Hill TN in the USA. More of Stacy’s work can be found on her Flooded in Light blog.

~*~*~*~*~*~*~*~*~*~*~*~*~*~*~*~*~*~*~*~*~*~*~*~*~
.

.