~ * ~
This article is written by Marilyn Harris Mills
Not all brushes are created equal, however, they are one of the most important tools to an artist. Just as scissors are important to a sewer and a saw is important to a carpenter, so too are brushes to an artist. In this article, we’ll look at the attributes of a brush, what the different types of brushes are used for and how to care for them. If we educate ourselves about brushes, they will last for years. Some of mine are more than fifteen years old and they look as good as the day I bought them.
Attributes of a brush
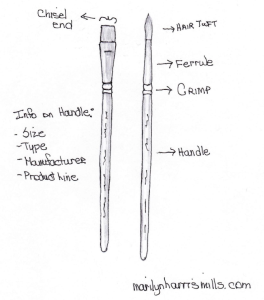
Each brush consists of a handle, ferrule and filament or hair.
Handles
Handles are usually made of wood or plastic and now, entering the market are metal handles. Wood handles are made of hard wood and manufactured both domestic and overseas. They are made proportioned to balance in the hand and to give optimum control when painting. The wooden handles are lacquer to prevent the wooden handle from swelling and to help prevent the handle from crackling or warping when in contact with a fluid. It is important to not leave brushes in water, otherwise the lacquer will crack and the wood will absorb the liquid and the brush becomes destroyed. Plastic handles will not do this, however, they usually cost a bit more. Length and diameter are important to heed. Long handled brushes are used when working with an easel; oil painters prefer long handles for this reason. Short handled brushes are for working on a table and preferred by acrylic, watercolour and craft painters. Large diameter brushes aids those with hand pain but they can be used by anyone. Different brushes tend to fit differently in the hand, thus giving good control when painting. Select brushes that feel good in the hand since you’ll be holding the brush for a period of time. The handle of the brush provides good information when selecting. The name of the manufacturer, the product line name, the shape & size of the brush and the type of the brush are shown. Be informed on the different types of brushes, the salesperson will not always select the right one for your comfort or the project.
Ferrules
A ferrule is the part that connects the filaments or hairs with the handle. Ferrules will determine the size of the brush, the numbers of filaments in the brush. The ferrule is crimped at one end to hold the filaments in place…..the other end is glued onto the handle. The ferrules can be made with either metal or plastic. Different manufacturers have different brush sizes – a #3 round could be different from one manufacturer to another. The different sizes of brushes could affect the learning of a particular skill or technique. Keep this in mind when choosing a brush – a brush that has a different series number or not in the same product line as recommended. Most manufacturers give a detailed analysis of their brushes on their websites.
Filaments
Filaments are the hairs or bristles of the brush. There are so many choices, it can be a bit overwhelming. They are glued together at one end before being crimped into the ferrule. One type of filament is a “bristle” brush. These are course and come in a variety of lengths. The shorter or stiffer bristles are usually used with thicker paints that require a lot of blending of the paints whereas thinner paints are best applied with longer or softer hairs that do not create texture. Then there are natural filaments, synthetic filaments and mixed filaments. Natural hair refers to filaments that come from the fur of an animal i.e. squirrel hair or mongoose, hogs, mink, badger etc. They are very good at holding fluid because they are so absorbent. The natural brushes can be used for any medium whether it’s oils, acrylics, watercolours etc. They are super great for working with heavy bodied paints and work well on rough surfaces. Synthetics are man-made. They were developed to provide substantial use of the brush. Used with any medium, these are the workhorses for many an artist. Synthetic bristles have thicker filaments and are ideal for rough or hard surfaces such as ceramics and craft projects. Brushes that are “synthetic hairs” are softer and finer, hold a lot of liquid, & keep an excellent fine chisel edge. A “mixed hair” brush combines both natural and synthetic filaments. Note that there are also non-professional brushes on the market common for using with crafts. These tend to be cheap nylon bristles and don’t hold much paint primarily because of their intended use. Craft brushes are not used for fine painting. If they’re sold in a package, sometimes they are simply craft brushes not for the discerning artist.
Synthetic hair brushes provide a smoother stroke than natural bristle. They retain their stiffness and are very durable. They clean well with soap and water when used with acrylics or other water based media. When used with acrylics, natural bristle brushes lose their stiffness, but they do hold more paint. Synthetics or bristle is an acquired taste. Differing needs, uses and budgets need to be considered.
Firmness (spring) of the Filaments
Often overlooked and not considered when choosing a brush is the “spring” or firmness of the filaments. It’s important for the filaments to retain the ability for them to fall back into their natural shape. When purchasing a brush, test the brush first in some water, shake it once and every one of the filaments should realign themselves back into their required shape. Good art stores usually have a dish of water for this purpose. If there are scraggly filaments out of place, don’t purchase the brush because those scraggly filaments will affect your painting. The amount of “spring” (falling back into shape) desired is dependent on if you have a very light touch or a heavy handed approach to painting. The amount of spring in a brush will affect your painting. The brush can feel stiff and hard to control or the opposite, too much spring for your control. It’s best to try a few different brands so that you can choose the right type of brush for the amount of pressure you use.
Types of brushes
There are so many many brushes – washes/glazes, rounds, flats, filberts and liners and more. Choosing the right type for the technique is important. Let’s look at the different types.
Flat Brushes
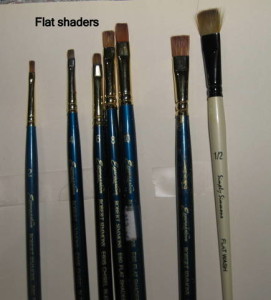
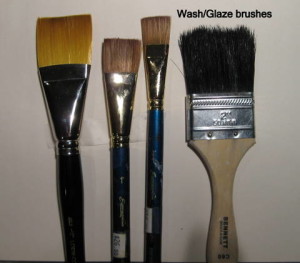
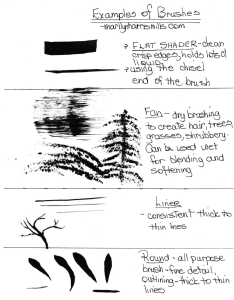
Flats are brushes with a straight chisel edge and square shaped filaments. These can be known as shaders if they’re in smaller sizes and washes/glazes if in bigger sizes. Large areas are painted with a wash/glaze brush whereas smaller flats are used for small areas of painting
Round brushes
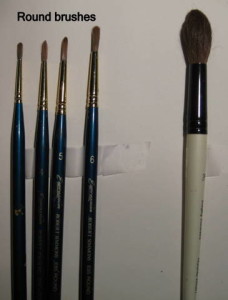
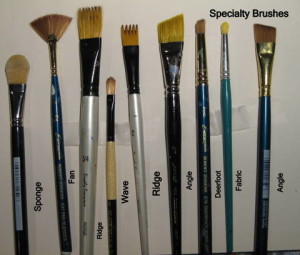
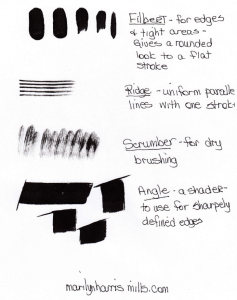
Round brushes have a large diameter of the ferrule, more so than a liner, which can be used for applying thick to thin lines, filling in odd shaped areas, painting details and work great for lettering. Liners don’t hold as much paint as a round, however, they are super great for creating lines or curves. Script liners are similar to liners but the filaments are much longer and hold more paint. A round brush tapers to a pointed tip – several types of rounds are referred to rounds, liners or script liners. Angle brushes are filaments that have been cut on an angle – these are excellent to use in small or curved areas of the painting.
Filberts
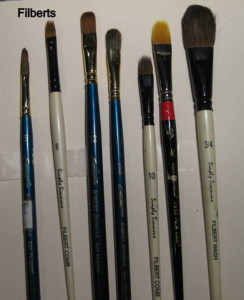
Brushes with oval shaped filaments are known as filberts in smaller sizes and oval wash in larger sizes. Both shapes can be used for base coating, stroke work and more. There are filbert combs, filbert wash and more.
Mop Brushes
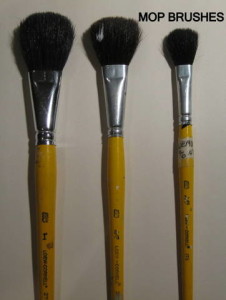
Then there are mop brushes – great for blending and smoothing out small areas. They’re also ideal for applying powdered pigments – just dust them lightly over hot or tacky wax.
Specialty Brushes
Then there are all the speciality brushes on the market used for certain techniques and garner their own results– fan, deerfoot, scumbler, mops and more
Quality versus Budget
Just because a brush is expensive doesn’t always mean that it’s the best brush on the market. Every manufacturer has their own top-of-the-line brush. A Kolinsky mink brush is the very best there is, but not all Kolinskys are created equal – some are very low grade. Also, the best brush does not mean that you’ll be the best artist either! Each artist/teacher has their own preference. Each brush creates its own techniques. Control, firmness, style, synthetic, natural, media type, size, shape are all things to be considered when choosing a brush….and price. Only the artist can decide what is right for themselves.
Brush Care
When you purchase a new brush, it is important to wash the sizing out of it. Similar to a new blouse/shirt that is starched, so too is a brush. It has sizing in the filaments to protect the brush in shipping. Some brushes even come with a protective plastic sleeve cover. Remove this cover and throw in the garbage. This cover is never to be put back on the brush because it will damage the filaments of the brush. Never leave your brush sitting in liquid. Never rest it on the filaments because by doing so, the brush may lose its shape. Never load so much paint onto your brush that the paint works its way into the ferrule – this will damage it. Never let a brush stand on its handle because by doing so, the liquid will drain into the ferrule and consequently into the handle thus corroding the glue and wood. Do not immerse the brush into water so deep that it comes up to the ferrule. Always clean your brushes with cold water – same as the water basin – always use cold water. I always paint with one basin for dirty water and one basin for clean water. When painting, do not let the brush sit unused otherwise the paint will dry on the brush. After finishing your brush strokes, put the brush in the dirty water to off load the paint and then it can be laid on a paper towel.
Never clean a brush with detergent. Use a brush cleaner, or a bar of Ivory soap. After cleaning, I hand dry the brush handles with a towel – similar to drying the dishes…and then I reshape the filaments before laying them flat. Laying them flat to dry will prevent moisture from weakening the glue in the ferrule.
When actually cleaning a brush, I run it across the soap with a light pressure of the hand. If using oil paints, the brushes should be cleaned with mineral spirits or turpentine. I stroke the brush back and forth in the palm of my hand. This moves the soap into the filaments or hairs. I then lightly massage the hairs through the ends of my fingers…..I rinse and repeat until my brushes are clean or until the water runs clean. Cleaning my brushes properly is a big deal for me, consequently, my brushes are still performing well after 15 years. 7
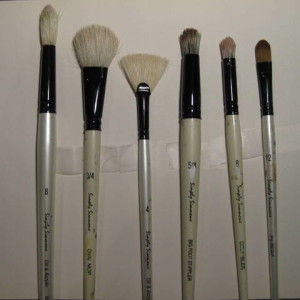
As one final note……if you’re taking a class with me, I recognize that as a beginner, budget is important. There is a line of brushes manufactured by Robert Simmons and are available at Michael’s. The product line is called “Simply Simmons” – white handled. They come in short or long handled dependent on whether you’re using an easel and are available in both synthetic and bristle. They are very affordable at $5.00 and are a good choice for any of the speciality
brushes required. If you want to learn even more about brushes check out the Dick Blick website
Brush and Painting Results
Next we’ll look at some painting results of the different brushes….
I hope all this information has helped you learn more about brushes. There are a lot on the market to choose from so it helps to be educated on them.
Happy Brushing!
~*~*~*~*~*~*~*~*~*~*~*~*~*~*~*~*~*~*~*~*~*~*~*~*~
Marilyn Harris Mills, aka Maer, is a Published Artist, Teacher and Designer, in Ottawa Canada.
You can read about Marilyn at Maer’s Muses or join her online Watercolour Pencil Class. Her art has been published in “Creating Time: Using Creativity to Reinvent the Clock and Reclaim Your Life”
“I work in whatever medium likes me at the moment”-Mark Chagall
~*~*~*~*~*~*~*~*~*~*~*~*~*~*~*~*~*~*~*~*~*~*~*~*~
.
.


Recent Comments