~ * ~
This article is written by Francesca Albini
One of the most annoying things is when your pens go dry and you have to throw them away. It really hurts me to get rid of any tool that can be used or should have been used for my art. So I don’t. I find ways to rescue almost everything by making my own handmade inks.
Every time one of my ballpoint pens goes dry I take a pair of scissors and snip the plastic reservoir into a bin or plastic bag (they tend to fly across the room otherwise!), then put the segments in a small container. When I have enough segments (two or three reservoirs), I pour a little bit of surgical spirit into the container, close it really tight and shake well. The result is a purply blue ink. If it’s too light in colour, wait a day for some of the spirit to evaporate. I suggest you use a cheap brush with this ink, as it can be harsh on the bristles.
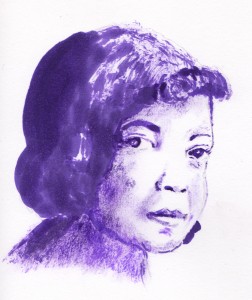
Here is a portrait of the singer Sippie Wallace I painted with homemade ballpoint ink. Because this ink is quite viscous, instead of diluting it with water or more spirit to obtain lighter shades I prefer to dry the brush on a tissue. Using an almost dry brush gives the painting an unusual and pleasant grainy feel. Ballpoint ink is not the easiest of mediums to use, but it is fun to experiment with.
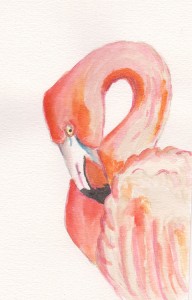
Gel pens are particularly prone to get dry very quickly. Snip the dry reservoirs and put them in a container, as above, but this time dilute with water. I like the ink made with gel pens because it very often has a shiny, glittery texture. Here is a flamingo I painted using ink made out of a few pink and orange dry gel pens. Gel pen ink is also easier to use, as it can be further diluted with water.
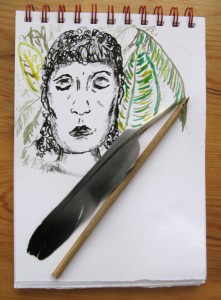
I spent the Christmas holidays going for walks in various parks and gathered a few things that I could turn into art tools, like bamboo stems and a pigeon feather (hoping the ex owner didn’t have the flu!) There are many sites on the internet that show you how to make reeds and quills. It’s really quite simple. Cut the shape of the nib with a craft knife, test and trim until you are happy with the marks it makes. While my husband was trying to have a serious conversation with me, I doodled his portrait with my homemade bamboo reed and Indian ink. He ended up looking a bit like the Buddha, so I thought of adding some tropical foliage in the background with my pigeon quill.
Playing with homemade inks and found or recycled materials is fun, creative, cheap, and makes you feel good.
~*~*~*~*~*~*~*~*~*~*~*~*~*~*~*~*~*~*~*~*~*~*~*~*~
Francesca is a visual artist using pretty much everything she finds around her to record and relive feelings and memories of places and emotions. She collages, paints, draws, photographs. Francesca loves mixing modern technology, such as mobile phone apps, with the simplest of tools such as glitter glue, crayons and other children’s art supplies.
Read her blog at Fran’s Journal Blogspot
~*~*~*~*~*~*~*~*~*~*~*~*~*~*~*~*~*~*~*~*~*~*~*~*~
.
.


Recent Comments