Faux Dichroic Glass

This article has been written for us by Linda Giese

Making faux dichroic glass is a little smelly and time consuming, but a whole lot of fun and endlessly creative!  Whenever I get out all the stuff I never want to stop.  I keep adding more elements, trying new color combinations and when something works particularly well, I want to do it again before I forget what I did.

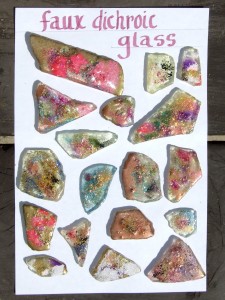
coloured glass

There is a little planning in the process and a whole lot of serendipity. I’ve been surprised more than a few times with how a particular embossing powder acts on the surface.  Some spread into flower blossoms and some leave airy spaces while others cover everything you did before.  The Asian text loses the paper and leaves the beautiful lettering.

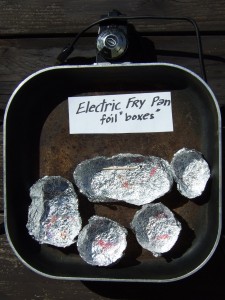
So let’s get started.  I use my 44 year old electric frying pan for my heat source.  I learned the technique from a friend with a hot plate.  We set the glass on a craft sheet, but often burned our hands or dropped the glass using tongs.  I tried to find an inexpensive used hot plate to no avail, so looked for another option.  One more of my small appliances is now dedicated to my art.  I tried putting my glass pieces on a craft mat, but soon had powder and beads all over my pan.  I also burned my fingers and dropped a few pieces.

Frypan to make your own coloured glass

I tried aluminum pans, but most had patterned bottoms so the heat was uneven and parts of the embossing powder took forever to melt.  My little foil boxes work so well.  I can pick them up easily and keep most of the powder inside the boxes. I can also easily remove the finished pieces while leaving others in place.

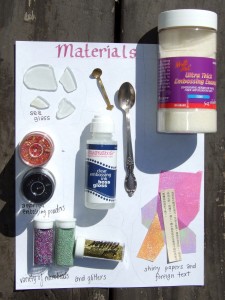
The other materials you will need are sea glass, clear embossing ink, clear ultra thick embossing powder, assorted colored embossing powders, a small spoon for adding new elements and a toothpick for moving things around.  Optional extras are microbeads, glitters, shiny papers and foreign text.

materials needed to make your own coloured faux dichroic glass

The sea glass can be clear or colored, but should be nice and flat.  If you can get real sea glass with the smooth edges, that would be ideal.  But I often uses the bag of sea glass from the craft or dollar stores.  I prefer the bottle of embossing ink with the dauber top to the pad.  I feel I have more control and get better coverage.  I found my shiny papers at the dollar store as holographic tissue paper.

The process is quite easy.  I heat the frying pan to between 250 and 300 degrees fahrenheit   I tear some pieces of aluminum foil and fold up the sides, pinching the corners for open boxes, trying to keep the bottom nice and flat.  I put embossing ink on one side of the glass and dip it in the clear ultra thick embossing powder.  Put the glass, powder side up, in the foil box and into the heated pan until it melts.

Now it is time to have some fun.  Add some papers (save the text for a near the top layer)or add microbeads, or colored embossing powders a bit at a time with a very small spoon.  Let each layer melt before adding more.  Don’t add too much powder at a time. Whenever you want something to show through, add more clear embossing powder on top.

I keep preparing new pieces while waiting for others to melt.  You will know it’s all melted when the whole top is shiny.  You won’t have to add any more embossing ink after the first layer because the wet powders will grab the additional layers.  Leave the pieces in the pan as you add things and remove when they are finished.  The top edges of the foil are cool enough to carefully lift out of the pan, but be aware that the glass will be very hot!  Let it cool before you touch it.

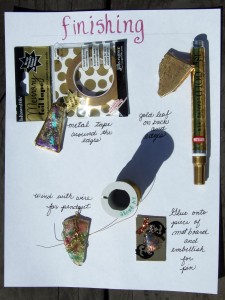
materials needed to finish your own glass

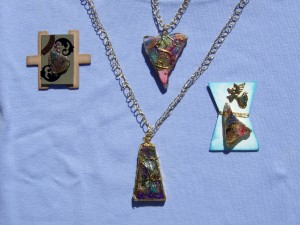
Now that you have a nice array of beautiful pieces, what do you do with them?  Most of mine are made into pendants.  I also crochet gold thread (just a chain stitch) for the necklace when I sell them.  I use 24 gauge wire, cut a piece, make the top loop, wind randomly and tighten.  Sometimes I use my gold pen on the edges and or back.  I tried the metal tape around the edge, but wasn’t pleased with the result.  I also like making the smaller pieces into pins.  I glue them (I use Aleene’s Tacky Glue) to small pieces of mat board and embellish them.  I adhere a pin back.  You can also use them on a mixed media canvas or board.

faux dichroic glass pendants and brooches

Let me know if you come up with more ideas for additions or uses.  Have fun and be creative!

Hugs, Linda

~*~*~*~*~*~*~*~*~*~*~*~*~*~*~*~*~*~*~*~*~*~*~*~*~

Linda Giese has an altered book in the Autumn 2012 issue of Art Journaling.
 She welcomes emails, questions and comments at linda.giese@yahoo.com

~*~*~*~*~*~*~*~*~*~*~*~*~*~*~*~*~*~*~*~*~*~*~*~*~

.

.
Artistic Jewelry made from Fiber and Fabric

~ * ~

This article was written by Katja Blum

Mixed media and jewelry are a great combination – jewelry is a perfect way to take a piece of your art with you in your everyday life, and thinking about the functional aspects and size of jewelry gives you an interesting framework for your creative ideas.

I selected this project to highlight the endless possibilities of mixed media jewelry with fabric and fiber, because you do not need any special jewelry tools or skills to make this pretty bangle. You probably have some pretty fabric scraps lying around, some rope, a few beads … no pliers, hammers and anvils necessary.

You need:

  • 3 pieces of woven or braided rope to fit around your wrist – any thickness, as long as it bends easily. Man-made is fine, but those solid plastic ropes like clothesline don’t work well, because you need to be able to pass a needle through.
  • Duct tape
  • Assorted fabrics, fibers and beads
  • Mod Podge, Fray-Stop or PVA glue to treat fraying fabric edges
  • Needle and thread
  • Thin craft wire, yarn or thread to wrap around the bangle, if desired

Jewelry made from Fiber and Fabric

To cut the lengths of rope to size, measure the inner circumference of a bangle you like. If you don’t have one, here’s how you can measure: Hold out your hand, palms down, fingers together. Tuck your thumb and pinky under, so that they touch underneath the other fingers. Now measure around the widest part of your hand, which is probably close to your knuckles.

Don’t pull the measuring tape too tight. The bangle will have a slightly smaller inner circumference once you wrap the fabrics around. You won’t lose much though, so 1/4 to 1/2 inch (about 6-12 mm) should be enough extra length.

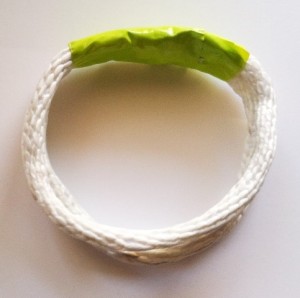
Cut the rope pieces to size, lay them out together and tape them with duct tape to form a closed ring. The three pieces are just connected at the bottom.

Jewelry made from Fiber and Fabric

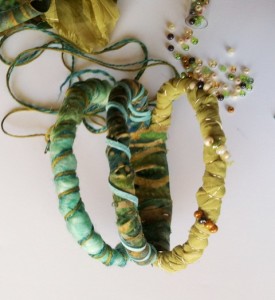
Cut long strips of fabric or use unspun, dyed spinning fiber to wrap each ring, beginning with the two outside ones, leaving the center one for last. Start wrapping at the duct-taped bottom, where the three rings separate. Don’t worry about the fabric and fiber ends. Just leave them hanging, they will be covered later.

Dab some Mod Podge or Fray-Stop on the fabric, if necessary. If you are using unspun fiber, covering all of the wrapped fiber with Mod Podge or something similar works best. Otherwise the fibers might come apart with use.

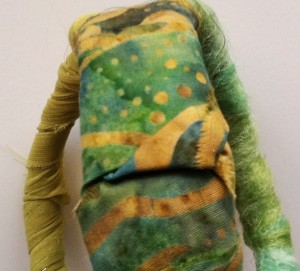
Smooth fabric like the batik cotton here works well for the center bangle. Start wrapping in the center of the duct tape at the bottom, tucking in the ends from the other bangles as you go. When you have wrapped all the way around, tuck the end of the fabric strip into one of the wraps. It will be secured with thread later.

Jewelry made from Fiber and Fabric

Jewelry made from Fiber and Fabric

Once you have your triple bangle wrapped in pretty fabric, the real fun starts. Decorate your statement piece to your heart’s content. Wrap it with thread, yarn, cord or thin craft wire (no pliers needed). Add beads to the wraps, if you like, or sew on individual beads. Glue or sew on charms, paper flowers, ribbon rosettes…you get the idea.

I had much more elaborate plans for this piece, but once I saw the colors of the fabrics and fiber together, I loved them and didn’t want to obscure them too much. Remember to begin all wrapped decorations at the bottom and tuck them into the fabric of the center bangle. When you are done, secure the fabric covering the duct tape and the tucked-in end with a few stitches. If you want the rings of your triple bangle to sit close together on your forearm, sew them together in a few places. A little bit of spray varnish helps protect your paper or other fragile decorations.

Of course you are not limited to three rings, nor do you have to wrap them individually. A five-piece bangle wrapped together (just use the steps for the center ring in this project) would make a terrific background for larger mixed-media decorations. The bangles are fun to wear and so easy to make that you’ll have a whole collection of your personal, wearable mixed media art soon.

Jewelry made from Fiber and Fabric

~*~*~*~*~*~*~*~*~*~*~*~*~*~*~*~*~*~*~*~*~*~*~*~*~

Katja Blum is a writer and translator from Tulsa, OK. As an artist, she started with yarn, fabric and papier mache (rarely together), branching out into collage and other paper arts about ten years ago. Her latest obsession is making soft stuffies and art dolls – to the delight of her toddler. She also likes to find creative solutions for ugly or broken things around the house – to the delight of her husband.

You can see more of her work with fiber, paper and words at www.thewaywardsheep.com

~*~*~*~*~*~*~*~*~*~*~*~*~*~*~*~*~*~*~*~*~*~*~*~*~

.

.
Altered Dominoes

~ * ~

This article is written by Shari Welch

Before you take your old games to the donation station,why not take a second look at them. Could you possibly reuse the board, box, or game pieces to create something artistic and beautiful? With a little imagination the possibilities are endless.

As a mixed media artist I am always looking for new materials to use when creating my art. As an avid reduce, reuse, and recycle kinda girl this project couldn’t be more perfect. I am going to give you the basic instructions and then you can have fun deciding how to finishing them. There are so many ways you can decorate dominoes. Pinterest is full of inspirational ideas. I have a board dedicated to them.

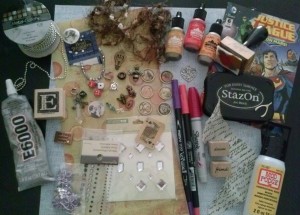
Here is what you will need:

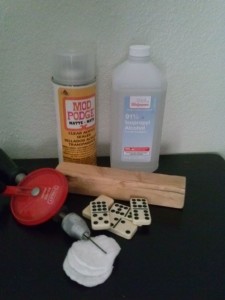
Shari Welch creates these fun altered dominoes. Here are the items you will need to get started

  • Domino game pieces
  • Rubbing alcohol, cotton pads
  • Hand drill with a small bit
  • Small piece of wood
  • Mod Podge Matte clear acrylic spray sealer

Here are a few ideas to use for finishing your dominoes:

Here are a few ideas to use for finishing your dominoes

  • Alcohol Inks, inking tool
  • Sharpie or any permanent marker
  • Found trinkets, beads, ribbon, eyelets
  • Old comic books and newsprint
  • Key chain, Ball chain, leather, magnets
  • Mod podge dimensional magic
  • Rubber stamps, permanent ink pad

Let’s get started

1.First you must wipe your domino with alcohol to insure no oils or dust is on them.

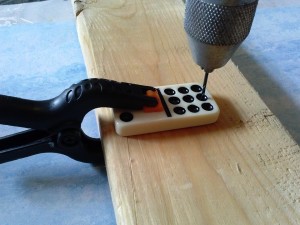
2. If you are making a necklace or want to add embellishments you will need to drill a hole. The dominoes are surprisingly easy to drill into.

The dominoes are surprisingly easy to drill

3. Add a background. Paper, alcohol inks, markers, stickers, rubber stamps.  This link will help show you how to use the inks in more detail. HINT: If you use alcohol inks and you are not happy with the results you can wipe it off with a little rubbing alcohol and start again.

4. Make sure your background is dry and then spray with an acrylic sealer.

5. After the sealer is dry you can add  more colors, stamping etc.

6. If you wish, you can now add embellishments to your domino.

Remember it is all up to you on how little or how much color and embellishments you want to add. Some of my favorite dominoes are stamped with black ink and that’s all.

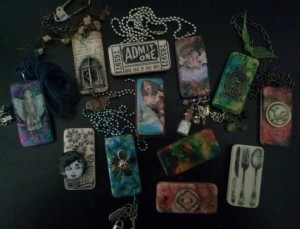
Here are a few dominoes I have made

Here are a few dominoes I have made

~*~*~*~*~*~*~*~*~*~*~*~*~*~*~*~*~*~*~*~*~*~*~*~*~

Shari Welch is a mixed media artist living in Denton Texas. She is known for using reuse and recycle materials in her artwork. She volunteers for SCRAP Denton where she is on the education committee, teaches workshops, art camp, and performs art demos. She is passionate about mixed media art and enjoys helping others discover their creativity.

You can follow Shari and see her mixed media art at her facebook page.
.

.

Wearable Art: Fabric and Fiber Jewelry

~ * ~

This article was written by Katja Blum

Mixed media and jewelry are a great combination – jewelry is a perfect way to take a piece of your art with you in your everyday life, and thinking about the functional aspects and size of jewelry gives you an interesting framework for your creative ideas.

I selected this project to highlight the endless possibilities of mixed media jewelry with fabric and fiber, because you do not need any special jewelry tools or skills to make this pretty bangle. You probably have some pretty fabric scraps lying around, some rope, a few beads … no pliers, hammers and anvils necessary.

You need:

  • 3 pieces of woven or braided rope to fit around your wrist – any thickness, as long as it bends easily. Man-made is fine, but those solid plastic ropes like clothesline don’t work well, because you need to be able to pass a needle through.
  • Duct tape
  • Assorted fabrics, fibers and beads
  • Mod Podge, Fray-Stop or PVA glue to treat fraying fabric edges
  • Needle and thread
  • Thin craft wire, yarn or thread to wrap around the bangle, if desired

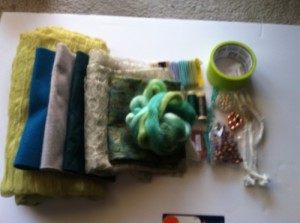
Fabric and fiber jewelry – Materials

To cut the lengths of rope to size, measure the inner circumference of a bangle you like. If you don’t have one, here’s how you can measure: Hold out your hand, palms down, fingers together. Tuck your thumb and pinky under, so that they touch underneath the other fingers. Now measure around the widest part of your hand, which is probably close to your knuckles.

Don’t pull the measuring tape too tight. The bangle will have a slightly smaller inner circumference once you wrap the fabrics around. You won’t lose much though, so 1/4 to 1/2 inch (about 6-12 mm) should be enough extra length.

Cut the rope pieces to size, lay them out together and tape them with duct tape to form a closed ring. The three pieces are just connected at the bottom.

Taped lengths of rope form the core of the bangle.

Cut long strips of fabric or use unspun, dyed spinning fiber to wrap each ring, beginning with the two outside ones, leaving the center one for last. Start wrapping at the duct-taped bottom, where the three rings separate. Don’t worry about the fabric and fiber ends. Just leave them hanging, they will be covered later.

Dab some Mod Podge or Fray-Stop on the fabric, if necessary. If you are using unspun fiber, covering all of the wrapped fiber with Mod Podge or something similar works best. Otherwise the fibers might come apart with use.

Smooth fabric like the batik cotton here works well for the center bangle. Start wrapping in the center of the duct tape at the bottom, tucking in the ends from the other bangles as you go. When you have wrapped all the way around, tuck the end of the fabric strip into one of the wraps. It will be secured with thread later.

Bottom of the bangle with fabric ends tucked in

[Wrapped rings of your fabric bangle

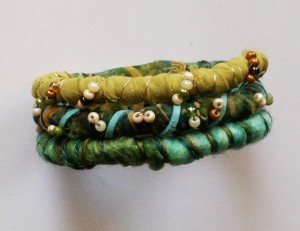
Once you have your triple bangle wrapped in pretty fabric, the real fun starts. Decorate your statement piece to your heart’s content. Wrap it with thread, yarn, cord or thin craft wire (no pliers needed). Add beads to the wraps, if you like, or sew on individual beads. Glue or sew on charms, paper flowers, ribbon rosettes…you get the idea.

I had much more elaborate plans for this piece, but once I saw the colors of the fabrics and fiber together, I loved them and didn’t want to obscure them too much. Remember to begin all wrapped decorations at the bottom and tuck them into the fabric of the center bangle. When you are done, secure the fabric covering the duct tape and the tucked-in end with a few stitches. If you want the rings of your triple bangle to sit close together on your forearm, sew them together in a few places. A little bit of spray varnish helps protect your paper or other fragile decorations.

Of course you are not limited to three rings, nor do you have to wrap them individually. A five-piece bangle wrapped together (just use the steps for the center ring in this project) would make a terrific background for larger mixed-media decorations. The bangles are fun to wear and so easy to make that you’ll have a whole collection of your personal, wearable mixed media art soon.

Wearable art – mixed media bangle

~*~*~*~*~*~*~*~*~*~*~*~*~*~*~*~*~*~*~*~*~*~*~*~*~

Katja Blum is a writer and translator from Tulsa, OK. As an artist, she started with yarn, fabric and papier mache (rarely together), branching out into collage and other paper arts about ten years ago. Her latest obsession is making soft stuffies and art dolls – to the delight of her toddler. She also likes to find creative solutions for ugly or broken things around the house – to the delight of her husband.

You can see more of her work with fiber, paper and words at www.thewaywardsheep.com

~*~*~*~*~*~*~*~*~*~*~*~*~*~*~*~*~*~*~*~*~*~*~*~*~

.

.