Transparent Stamped Collage Layer Technique

~ * ~

This article was written by Elaine Brady Smith

I love adding collage to my mixed media art whether it’s in journals or on a piece that will hang on the wall. The collage papers that I make often spark ideas and I’m excited to mix and match to see how I can combine the layers. I am always prepared to get working when I have papers ready and on hand, so one of the things I do on a regular basis is to have paper making days when all I do for the day is make a whole lot of papers! Then on art making days, that big ole pile of collage paper just beckons to me to dive in and create something awesome!

One of my favorite go-to methods is adding transparent collage layers to my work. This adds depth and history which creates a more interesting piece of art. I can go crazy layering patterns, colors, and designs that all allow what is underneath to show through. This is added as a second stage, so after I’ve collaged or painted a start, I am ready to add the first transparent layer. There are many ways to add transparent layers to your work. The one I will talk about today is stamped layers on tissue paper that will be made transparent. When the process is complete, only the printed areas remain visible. It’s a lot of fun, so let’s get started!

Layering patterns and designs with transparent stamped collage layers.

Here is the supply list for this project:

Cardboard, Mat board, or Foam Core Board

Fun Foam

Pencil or Fine Point Marker

Scissors or XActo Knife

Gel Medium

White Tissue Paper

Sponge Roller

Large Paper Plate

Acrylic Paint (can be cheap 2oz bottles or tube paint)

Wax Paper

Large White Trash Bag (not the flex bags, they have pattern on them)

Masking Tape

1” Flat Paint Brush

Plastic or Paper Cup

Liquetex Gloss Medium & Varnish

Layering patterns and designs with transparent stamped collage layers.

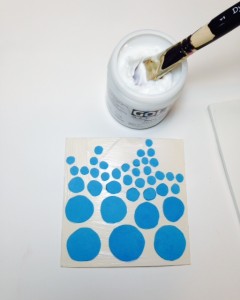
Cut both the board and the fun foam to the same size. I have cut mine to 5” square.

Layering patterns and designs with transparent stamped collage layers.

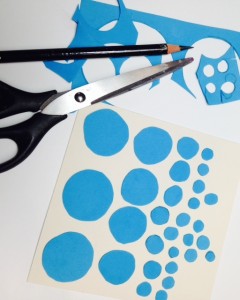
Draw your design on the fun foam with pencil or marker and cut out the pieces with scissors (or you can cut them out with an XActo knife).

Layering patterns and designs with transparent stamped collage layers.

Glue the pieces to the board by brushing a layer of gel medium over the board surface with a paint brush, and then place the pieces where you want them. Press the pieces down and make sure each piece is secured with gel medium. Wipe excess gel medium and allow the stamp to dry.

Layering patterns and designs with transparent stamped collage layers.

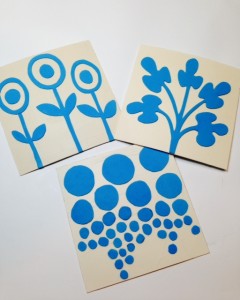
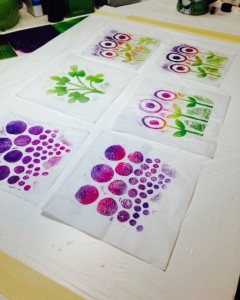
I have made 3 different stamps that I plan to print and then use in a collage.

Layering patterns and designs with transparent stamped collage layers.

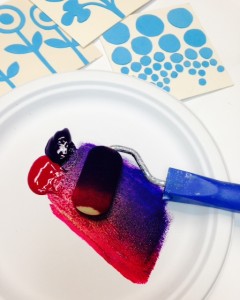
Place 1 or 2 colors of acrylic paint on one side of a paper plate and if you are using multiple colors, place them side by side on the plate. Tip the sponge roller into your paint and begin rolling out from the paint piles until the sponge roller is filled evenly with paint. This takes a good amount of paint. If you are using 2 colors, roll in a slightly left and right motion to mix the colors in the middle of the roller21.

Layering patterns and designs with transparent stamped collage layers.

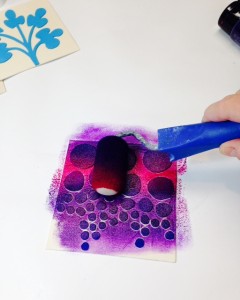
Place your stamp foam side up and roll the paint filled roller over it until it looks like the stamp is covered sufficiently with paint.

Layering patterns and designs with transparent stamped collage layers.

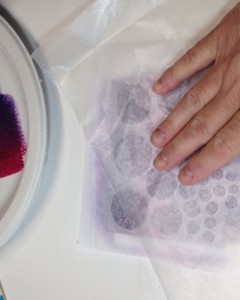
With the stamp facing up, place a piece of white tissue paper over the stamp. Place a piece of wax paper on top of the tissue paper and smooth out with your fingers making sure the tissue has made good contact with the stamp.

Layering patterns and designs with transparent stamped collage layers.

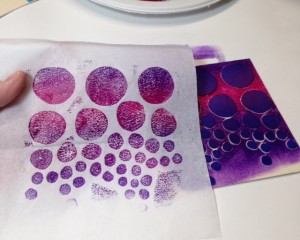
Remove the wax paper and gently pull the tissue off the stamp to reveal your image. You can repeat this process to produce a “ghost” image with another piece of tissue paper, or spritz the stamp with water from a spray bottle to revive the remaining paint. Each print will turn out slightly different as you print.

Layering patterns and designs with transparent stamped collage layers.

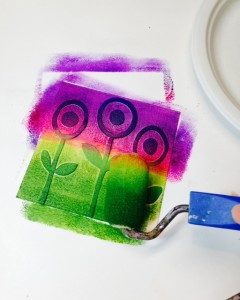
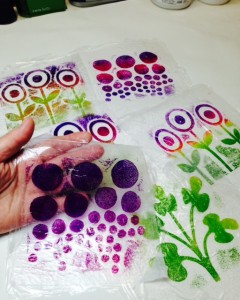
You can experiment and play with the paint colors. Here I have rolled two shades of purple on the top of the stamp with a sponge roller and with another sponge roller, added two shades of green to the bottom of the stamp.

Layering patterns and designs with transparent stamped collage layers.

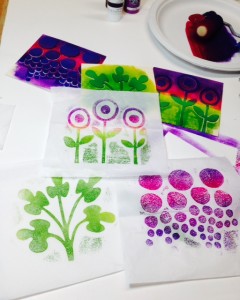
I’ve have made a variety of prints from the 3 stamps I made, so that I have multiple choices when I am ready to collage.

Layering patterns and designs with transparent stamped collage layers.

After your prints are dry, lay them on a white trash bag that has been taped flat to a hard surface such as a table top or board.

Layering patterns and designs with transparent stamped collage layers.

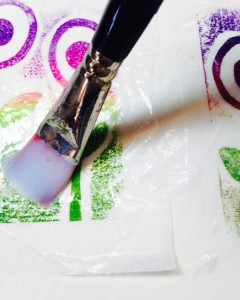
Put a small amount of Liquetex Gloss Medium and Varnish in a plastic or paper cup. With a paint brush begin to generously paint the entire surface of the printed tissue paper with the medium. You can leave a tiny corner of the tissue paper unpainted to use as a lifting point. Allow this to dry overnight.

Layering patterns and designs with transparent stamped collage layers.

When the medium is dry, carefully lift the printed tissue from the plastic bag. It will be completely transparent, except for the parts that have been printed with the paint.

Layering patterns and designs with transparent stamped collage layers.

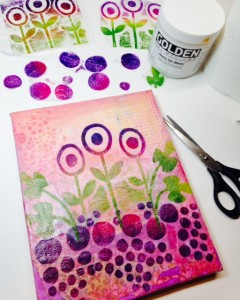
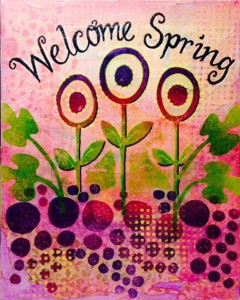
You can now add the transparent collage pieces to your art. My piece was done on an 8” x 10” stretched canvas. I started with paint, collage layers and a bit of stenciling and when the initial layers were dry; I cut and glued my transparent prints down with gel medium. You can add many of these transparent prints with different patterns to your piece to get a unique effect. Try combining different patterns or the same pattern in a variety of positions or colors.

Layering patterns and designs with transparent stamped collage layers. Make your own stamped layers! Learn how to create your own original transparent collage papers! This is an inexpensive technique using Fun Foam and acrylic paint to print on tissue paper that will then be made transparent. Your prints can be layered in your mixed media art producing depth and interest in your art.

Here is my completed collage that I finished with Sharpie paint pens and some additional stencil layers.

I hope you have fun playing with this technique!!!

~*~*~*~*~*~*~*~*~*~*~*~*~*~*~*~*~*~*~*~*~*~*~*~*~

Author bio:

Elaine Brady Smith loves creating acrylic mixed media and encaustic collages. Key ingredients in her work are vintage papers and her own collage papers made with repetitive marks, simplistic shapes and transparent layers.  She also enjoys other art mediums such as art journaling, oil painting and colored pencil drawing in addition to writing, teaching and spending time with her family. Find more on her website: elainebradysmith.com and on Facebook: Elaine Brady Smith Art

~*~*~*~*~*~*~*~*~*~*~*~*~*~*~*~*~*~*~*~*~*~*~*~*~

.

.
Mixed Media Artist: Ann Strecko Koeman

This article is writen by Ann Strecko Koeman

Hi. My name is Ann, I have always been making stuff. In fact just two days ago a fellow scrap booking friend stopped by my house, it was her first time. As I was giving her the nickel tour of my home and then my craft room area she asked: “Is there ANYTHING you don’t do?” I did have to admit that I don’t know metal work very much. Hee hee. Actually, there are probably many things I could learn and it will take more than the rest of my life. That is why I am hardly ever bored, I am too busy.

Ann’s Arts and Crafts         Ann’s Arts and Crafts         Ann’s Scrapbook

As a little girl I would spend hours gluing, stapling, taping, and stringing odds and ends into whatever my imagination wanted. I learned to sew at my mother’s side when I was at pre-school. I wrote little stories and illustrated them. I learned to knit and cook before I was nine. I loved flowers and playing in the dirt in my toddler years. As an adolescent I built forts in our woods and igloos in the winter. I have always been creative and wanted to make whatever I imagined.

Ann’s Arts and Crafts         Creativity         Creativity

Today at, ahem… 45 years, I have amassed an incredible collection of skills and stuff. My skills impress my friends and family. My stuff, well, shocks! But it is organized! I love to collect stuff and find a use for it down the road. My collecting, repairing and repurposing drives my husband insane! He has little vision! We clash. I persevere. I do not like to throw stuff out and just go buy new. I hate waste. Thankfully we own a large home and I am able to stuff it in an organized manner. Hee hee

Arts and Crafts                                              Arts and Crafts

My children think I can fix anything! And always bring me stuff to repair. They think it is normal, and believe every mom can multi task and is creative. I have sewn and knitted many or their baby clothes. I continued to sew many articles for them over the years. Even now in their teenage years I sew some of their pajamas. I do more altering and repairs now, as they are, well, teens. I have made many of their costumes for Halloween or plays. I crochet some of their favorite video game characters. We have made buildings and towns out of cardboard boxes, board games from the recycling bin contents, and more.

Until a few years ago I had never heard of Mixed Media. When I did I thought, “that’s me!” I do and love so many things and often combine them. I sew, knit, crochet, scrapbook, do paper crafts, draw, paint, repurpose, decorate, garden, cook etc… In art school I got discouraged because of one professor, and there was family pressure to have “something to fall back on”. I switched concentrations. I went to University and Graduate school and became a professional. And hated it! I kept my “hobbies” and became a wife and mother, I was happier!
My kids are my proudest creations.

Ann,

~*~*~*~*~*~*~*~*~*~*~*~*~*~*~*~*~*~*~*~*~*~*~*~*~

Ann lives east of Ottawa, Canada’s capital, in a small bucolic country town with her husband of nineteen years, their two teenage sons and a meowing fur ball on four legs.  She has been creating since she could hold scissors and hasn’t stopped.  She was introduced to mixed media four years ago and declared: “That’s me”.

You can see more of Ann’s work at Ann Makes.

~*~*~*~*~*~*~*~*~*~*~*~*~*~*~*~*~*~*~*~*~*~*~*~*~
.

.
Mixed Media Art Trading Cards Using Mod Podge

~ * ~

This article is written by Kim Bailey

In May of last year I joined a 365 Day Challenge and for this challenge I decided to go on an art journaling journey. During my journey, I explored new ways of expressing my creativity. One of the ways I did this was making Mixed Media Art Trading Cards; bite sized pieces of art that you can trade or just keep for yourself. Below is what you will need to make your own.

Materials:

Card stock or junk mail post cards, magazine clippings, acrylic paints, markers, embellishments, (and your other favorite crafty/artsy materials), glue, foam brush and of course Mod Podge.

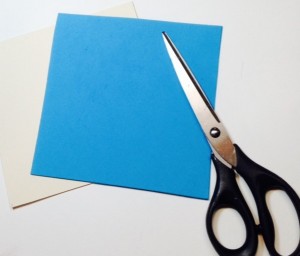
  1. Cut (2) 2 in. x 3 ½ in. pieces from your card stock or junk mail post cards.
  2. Now it’s your time to be creative. Using the magazine clippings, acrylic paints, markers and embellishments create pieces of art on these 2 tiny canvases.
  3. Once you have created your 2 pieces of art, glue them together. You’re finished product should be one decorated card. (The card should actually be the size of a standard business card).
  4. The last step is to Mod Podge your card. To make this step easier and less messy, use your foam brush to apply the Mod Podge. I suggest doing one side at a time so that it dries evenly.
Trading Cards     Trading Cards using Mod Podge     Mod Podge Trading Cards
Not only can you use this idea for trading cards, but if you’re really ambitious it’s also a great way to put a spin on your business cards for special events.

Happy Mod Podging!

~*~*~*~*~*~*~*~*~*~*~*~*~*~*~*~*~*~*~*~*~*~*~*~*~

Hello Mixed Media Art Addicts! My name is Kim and I live and create in New York. As a lover of all things crafty and creative I decided to start a blog about 2 years ago to document my obsession. My blog was called The Creative Addiction Blog – it’s not around anymore (sorry!). Currently, I work as a Creative Art Photography Support Assistant within a retail store.  My job helps to fuel not only my creativity, but also my love for photography.

~*~*~*~*~*~*~*~*~*~*~*~*~*~*~*~*~*~*~*~*~*~*~*~*~
.

.
“Truth” and “Time”: A Mixed Media Art Journal

This article is written by Cecilia Sanchez

I had many things to tell, but are all negative thoughts and makes me sad. I decided to hide those negative thoughts and only save two words of optimism. “Truth” and “Time”is my latest art journal page.

Materials:

  • Gesso
  • Color wash
  • Waterproof ZIG writer
  • Stencils
  • Acrylic paint
  • Distress ink
  • Metalic Zig writer
  • White uniball Signo
  • Masking tape
  • Stickers of letters
  • Wooden hearts
Art Journal Instructional Video

~*~*~*~*~*~*~*~*~*~*~*~*~*~*~*~*~*~*~*~*~*~*~*~*~

"Truth" and "Time by Cecilia SanchezMy name is Cecilia Sanchez and I live in Málaga, Spain. I am married and we have three gorgeous sons: Javi (9), Antonio (6) and Jorge (6). They inspire me every day with their crazy ideas.

Since my childhood I liked photography, drawing, collage and make photo albums with cuts and travel souvenirs. I also love crafts in general. In 2006, a few months after birth of my twins, I discovered scrapbooking, digital first and then the traditional. I love to do 30X30 pages, cards and mini albums, and for over a year I am fascinated with the Art Journal and Mixed Media.

I am inspired by everyday things, feelings … The art journal is a real diary for me, because sometimes I need to express my feelings with colors and shapes

I love learning and discovering new techniques and materials. For a couple of years I began to take courses online and in person to learn new techniques and to incorporate them into my work. Since September 2010, I am part of the design team of Sweet Card Club, a monthly challenge blog cards.

From May 2011 also became part of the European team KURETAKE design, manufacturers of markers and pens Zig Memory System.

Since October 2011 I organize workshops Scrapbooking on “My Pink Scrapbook” unique physical scrapbooking store in Malaga.

~*~*~*~*~*~*~*~*~*~*~*~*~*~*~*~*~*~*~*~*~*~*~*~*~

.

.