Review of Janelle Nichols’ “Little Birdie” Online Class

~ * ~

This article is written by Ann Strecko Koeman

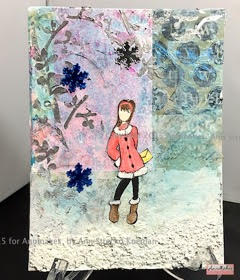
A while ago I got the opportunity to review Janelle Nichol’s Mixed Media class: Little Birdie. The class is available at “Skillshare”.  Being an avid maker of all things, and a lover of learning new techniques I was very much looking forward to testing out this new to me format. I can honestly say that I was pleased.

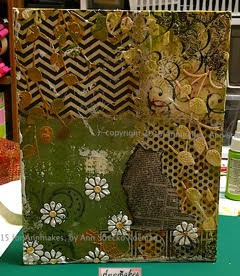
Ann’s project

For one thing, going on the Skillshare website was easy.  Second,  finding the class by Janelle was simple.  All that was required of me were a few clicks on the keyboard. Easy peasy! The hard part came when I began to doubt my own abilities to create something as pretty as the teacher herself had made. However, it did not take long for the soothing voice of the teacher to ease my concerns.

Janelle takes the time to explain all the steps involved in making the project. She gives a lot of information and goes into quite a lot of detail on how to accomplish each step. My favourite aspect of taking the class was the ability it gave me to stop, pause, go back to any part of this video class.  As my own life got quite busy all of a sudden. I needed to take a long break from completing the class.  However, when I returned I was able to just replay the video and begin anew.

Ann’s 2nd project

I enjoyed taking a class in this format because of the flexibility it allowed. I also appreciated the extensive notes and lists that accompany the class. It was a pleasure for me to create two projects over on my Youtube channel Annmakes that were due in part to the influence I got from taking Janelle’s class. The links to the two examples I made are here:


You can view the introduction to the Little Birdie class on Skillshare here.

~*~*~*~*~*~*~*~*~*~*~*~*~*~*~*~*~*~*~*~*~*~*~*~*~

Ann loves to collect and organize as many tools and supplies as possible because she is always making things.  Incredibly she finds a use for most of her collections.  She enjoys making Mixed Media Art because it allows her to use all her skills and collections.

~*~*~*~*~*~*~*~*~*~*~*~*~*~*~*~*~*~*~*~*~*~*~*~*~

Disclosure: Access to this course was supplied by Janelle Nichols for the purpose of review. All opinions are that of the MixedMediaArt team. Some links on this page may be affiliate links and any purchases help to support the ongoing work by MixedMediaArt. 
.

.
Using Irresistible Pico Embellisher for your Mixed Media Art Projects

~ * ~

This article was written by Melanie Statnick

Irresistible Pico Embellisher

I really enjoy working with a new product. When I saw the Imagine Craft irresistible Pico embellisher I wasn’t sure what to expect with its precise tip applicator and the needle that inserts into it. It was foreign and I wanted to try it.

Irresistible Pico Embellisher

As a visual artist I could see numerous ways to add this texture into art pieces. I love to add details into my art and the Pico embellisher tip is perfect for this. On a piece of Bristol paper I drew up a doodle and gave it a go.

Irresistible Pico Embellisher

Irresistible Pico Embellisher

There is allowance for control with the tip the embellisher has, making lines and dots thick or thin depending on the pressure of how you squeeze. I did notice that the embellisher will suck some air creating bubbles on the next release.

Irresistible Pico Embellisher

Irresistible Pico Embellisher

I dabbed the bubble with a napkin and it broke leaving a ring. Another time I wiped it away and it left a mess. Please take care cleaning up any bubbles that may happen. This could have been something that happens with a first time user. I also wanted to try the embellisher freehand. I think it gives the drawing a needle point look.

Irresistible Pico Embellisher

Irresistible Pico Embellisher

Overall I think the irresistible Pico embellisher by imagine craft is an excellent tool for texture and more. With the verity of colors who know what your imagination will create.

~*~*~*~*~*~*~*~*~*~*~*~*~*~*~*~*~*~*~*~*~*~*~*~*~

Author bio: Melanie Statnick is a published artist/writer out of North Carolina. Melanie creates art daily from her private studio. Her style is happy and whimsy. Statnick’s artwork can be found in art galleries and shops extensively in NC with international private collections. Learn more about Melanie view her website at: www.melaniestatnickart.com

~*~*~*~*~*~*~*~*~*~*~*~*~*~*~*~*~*~*~*~*~*~*~*~*~

Disclosure: These products have been provided by Imagine Crafts  for the purpose of review. All opinions are that of the MixedMediaArt team.

.

.

Focal Points in Mixed Media Art

~*~

This article was written by Madeline Faiella

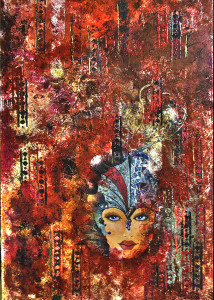
Emergence

We talked about telling a story with mixed media art and now let’s talk about adding texture.

Emergence

I chose this piece to explain the process because it’s easy to see what I did.  This piece is 3 feet tall and 2 feet wide but try it on a smaller surface if you like.  The surface I used is actually a court room board that an attorney let me have to which I added a base of white paint and gesso.  It’s great when you can re-use something.

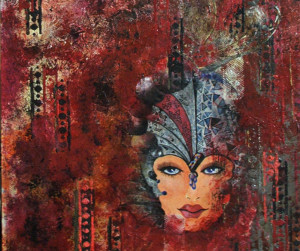
The face in this piece is done on paper, painted with acrylic and attached to the base with gesso.  I applied gesso and molding paste in layers across the base surface and around the face in light, graduated layers using a wooden stick.  It’s vital that the edges of the face “live” within the background so lighter layers are better.  Sometimes I add color to the gesso and/or molding paste but in this case I started with clear and let it dry thoroughly.  When applying many layers, drying is very important.  This piece took a while to complete because the humidity here in South Florida can make it very difficult for drying even with the air conditioner on.  Leave your piece to dry overnight between layering to ensure that it’s very dry.

Layer after layer I created my piece with careful planning yet enough spontaneity to keep it free.  I used a trowel and molding paste colored to my desired color and ran it over stencils, burlap and other means of textural items.  Keeping the colors in mind, step back from your work each time you add another layer or item.  Build layer by layer.  The bags that hold oranges make a great textural tool.  Be creative and see what’s around your studio.

Try new things, keep it layered and have fun.  Happy arting.

~*~*~*~*~*~*~*~*~*~*~*~*~*~*~*~*~*~*~*~*~*~*~*~*~

Madeline Faiella is the owner of Madeline Faiella Designs, LLC.  She is a “tradigital” artist.  She works traditionally and digitally in Photoshop and Adobe Illustrator.  Her work is featured on home décor, electronic devices, stationary, fabric and more.  Her arsenal of tools is broad and her work varied.  She is licensed, published, appeared on TV and radio and has written continuing columns for the art and creative community.  She has a line of non-toxic acrylic paint “Art Jacket” with Earth Safe Finishes.  Her art education hails from The School of Visual Arts in Manhattan and the many years she absorbed cultural enlightenment globe-trotting during a 23 year singing career.  She’s been drawing, sewing and making since she was a child. See more of her work at www.madelinefaiella.com

~*~*~*~*~*~*~*~*~*~*~*~*~*~*~*~*~*~*~*~*~*~*~*~*~

.

.

Story Telling through Mixed Media

~*~

This article was written by Madeline Faiella

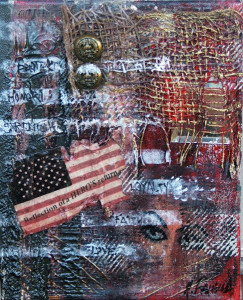
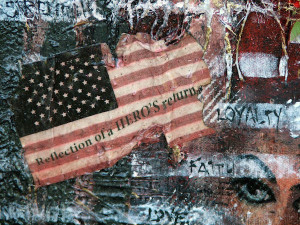
Hero’s Return

Mixed Media Art is a great way to tell a story with your art.  It can be a color theme that is beautifully put together or similar objects that tell their tale.  Mixed Media Art is a great venue for storytelling and I have a piece that I was inspired to do that tells a story.  It is called “A Hero’s Return”.

textured artwork using the irresistible Neon Pico Embellisher.

In this piece you a bit of mystery and strength in that the eyes are in the background and one can only imaging the many people who have lived and still live behind those eyes waiting and wondering about their loved ones.

There is layered texture and the color theme is strong.  The American Flag is paper that was put in water to age so it hassome life.  The soldier’s buttonsare “stand-out” elements that gives some call to your attention.  The burlap placed over the mirror allows you to see yourself and it causes you to think.  It is the reflection of yourself in the work.  The burlap adds that element of roughness and also stands to keep that reflection of you less clear; again, causing your mind and “eyes” to move (think) and look around the piece.  Keep the viewer’s attention. The color red is a great theme for a strong piece.

When creating your Mixed Media Art, ask yourself what is the story you want to tell.  It can be deep and intense or playful, fun and whimsical – or simply a work in colors.  No matter what story you are telling remember 3 things: 1) have a story to tell; 2) be sure your color theme is a good one; and 3) have fun while creating!!!

~*~*~*~*~*~*~*~*~*~*~*~*~*~*~*~*~*~*~*~*~*~*~*~*~

Author bio:Madeline Faiella is the owner of Madeline Faiella Designs, LLC.  She is a “tradigital” artist.  She works traditionally and digitally in Photoshop and Adobe Illustrator.  She is licensed and her work is featured on home décor, electronic devices, stationary, fabric and more.  Her arsenal of tools is large and broad and work is varied.  She is licensed, published, appeared on TV and radio and has written continuing columns for newsletters.  She also has a line of non-toxic acrylic paint “Art Jacket”   Her art education hails from The School of Visual Arts in Manhattan and the many years she absorbed global cultures during a 23 year singing career.  She’s been drawing, sewing and making since she was a child. Madeline sometimes exhibits at local galleries and she sells directly to a group of collectors of her fine art and jewelry. See more her work at www.madelinefaiella.com

~*~*~*~*~*~*~*~*~*~*~*~*~*~*~*~*~*~*~*~*~*~*~*~*~

.

.